

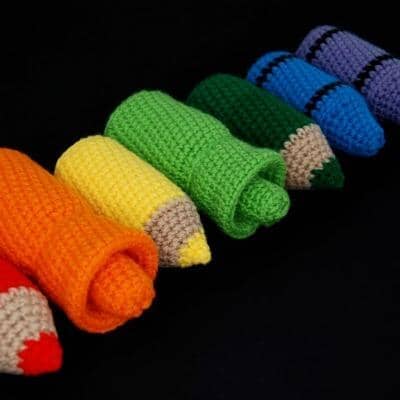
Get ready for back-to-school season with this free crochet amigurumi pattern featuring adorable chubby pencils, crayons, markers, and even some chunky highlighters! Inspired by the joy of school shopping and the magic of new supplies, these cute and colorful creations are quick to make, beginner-friendly, and perfect for gifting, decorating, or satisfying your inner office supply enthusiast. Crochet a full set in every color and relive the excitement of fresh notebooks and perfectly sharp pencils!"
Updated July 17, 2025

The summer is drawing to a close; familiar retail displays are shining with the promise of discounted spiral-bound notebooks, the smell of fresh pencils and crayons is in the air and it’s time to stock up on two-pocket folders, that’s right it’s BACK TO SCHOOL y’all! This month we’re making some adorable art supplies in the spirit of school shopping, because was there anything better than acquiring brand new pencils and crayons and highlighters and pens, erasers with sharp corners, and stacks of crisp notebooks up to the knee? For those of us who still suffer an office supply adrenaline rush, these adorable chubby pencils, crayons and markers are quick to make in every color and satisfying to hold (it’ll take you right back to the days of smaller hands and sidewalk chalk)! And I’ve got a special surprise for you because of course, I do: the highlighters are designed to link together.


SUPPLIES
-
Worsted weight acrylic yarn
-
Pencil: pink (10yds), silver (4yds), yellow (12yds), tan (5yds), dark grey (< 1yd)
-
Colored pencil: main pencil color (23yds), tan (7yds)
-
Highlighter: white (6yds) and bright yellow, bright orange, bright green, or bright pink (50yds)
- Crayon: main crayon color, black
-
Pencil: pink (10yds), silver (4yds), yellow (12yds), tan (5yds), dark grey (< 1yd)
- 4.0mm (US size G) Furls Streamline Metal crochet hook
- Stuffing
- Tapestry needle
- Chopstick to help with stuffing (optional)
PATTERN DETAILS
Finished Dimensions
Pencil: 4.5” long, 1.75” diameter
Colored pencil: 4.5” long, 1.75” diameter
Crayon: 4” long, 1.75” diameter
Highlighter: 5” long, 2.25” diameter
Notes
- Do not chain 1 at the beginning of rows unless otherwise instructed. When working in the round, do not join with a slip st or ch 1 at the beginning of rounds. Use a stitch marker to mark your rounds.
- In Part One we’ll be making pencils and colored pencils, then in Part Two we’ll graduate to crayons and linkable highlighters!
PART ONE

Pencil
With pink, ch 2 or magic loop
Rnd 1: 7 sc in 2nd ch from hook / loop (7)
Rnd 2: 2 sc in each sc around (14)
Rnd 3: *2 sc in next sc, sc in next sc* rep *-* around (21)
Rnd 4: *2 sc in next sc, sc in next 2 sc* rep *-* around (28)
Rnd 5: in BLO, *sc dec, sc in next 5 sc* rep *-* around (24)
Rnds 6-8: sc in each sc around (24)
SWITCH to silver
Rnd 9a: slp st in each sc around (24)
Rnd 9b: sc in BLO of each slp st AND through both loops of each sc from rnd 8 around (24)
Rnd 10: in BLO, sc in each sc around (24)
SWITCH to yellow
Rnds 11-19: now in both loops, sc in each sc around (24)
STUFF the pencil firmly. To help keep the eraser end flat, place the pencil on a solid, level surface and use a bamboo skewer to firmly stuff the bottom portion as it sits flat, then stuff the rest of the pencil.
SWITCH to tan
Rnd 20: sc in each sc around (24)
Rnd 21: *sc dec, sc in next 2 sc* rep *-* around (18)
Rnd 22: sc in each sc around (18)
Rnd 23: *sc dec, sc in next 2 sc* rep *-* 4x, sc in last 2 sc (14)
Rnd 24: sc in each sc around (14)
STUFF pencil tip
SWITCH to graphite
Rnd 25: *sc dec, sc in next sc* rep *-* 4x, sc dec (9)
Rnd 26: sc in each sc around (9)
STUFF a bit more to fill out the pencil “lead”
Rnd 27: sc dec until you can’t anymore, this is usually when I have only 4 sc left
FO and use the end to close the last 4 sc tightly together using a simple 'x' of whipstitches, pull tight to get that nice sharp point. Weave in ends.


Colored Pencil
With main colored pencil color, ch 2 or magic loop
Rnd 1: 7 sc in 2nd ch from hook/loop (7)
SWITCH to pencil wood color
Rnd 2: 2 sc in each sc around (14)
Rnd 3: *2 sc in 1st sc, sc in next sc* rep *-* around (21)
SWITCH to main colored pencil color
Rnd 4: *2 sc in 1st sc, sc in next 2 sc* rep *-* around (28)
Rnd 5: in BLO, *sc dec, sc in next 5 sc* rep *-* around (24)
Rnds 6-19: now in both loops, sc in each sc around (24)
SWITCH to pencil wood color
Rnd 20: sc in each sc around (24)
STUFF the body of the pencil firmly. To help keep the end flat, place the pencil on a solid, level surface and use a bamboo skewer to firmly stuff the bottom portion as it sits flat, then stuff the rest of the pencil.
Rnd 21: *sc dec, sc in next 2 sc* rep *-* around (18)
Rnd 22: sc in each sc around (18)
Rnd 23: *sc dec, sc in next 2 sc* rep *-* 4x, sc in last 2 sc (14)
Rnd 24: sc in each sc around (14)
STUFF the pencil tip
SWITCH to main colored pencil color
Rnd 25: *sc dec, sc in next sc* rep *-* 4x, sc dec (9)
Rnd 26: sc in each sc around (9)
STUFF a bit more to fill out the pencil “lead”
Rnd 27: sc dec until you can’t anymore, this is usually when I have only 4 sc left
FO and use the end to close the last 4 sc tightly together using a simple 'x' of whipstitches, pull tight to get that nice sharp point. Weave in ends.

PART TWO
This section is all about color....we are making the Crayon and Highlighter.

Crayon
With main crayon color, ch 2 or magic loop
Rnd 1: 7 sc in 2nd ch from hook/loop (7)
Rnd 2: 2 sc in each sc around (14)
Rnd 3: *2 sc in 1st sc, sc in next sc* rep *-* around (21)
Rnd 4: *2 sc in 1st sc, sc in next 2 sc* rep *-* around (28)
Rnd 5: in BLO, *sc dec, sc in next 5 sc* rep *-* around (24)
Rnd 6: now in both loops, sc in each sc around (24)
SWITCH to black
Rnd 7: sc in each sc around (24)
SWITCH to main crayon color
Rnds 8-16: sc in each sc around (24)
SWITCH to black
Rnd 17: sc in each sc around (24)
SWITCH to main crayon color
Rnd 18: sc in each sc around (24)
Rnd 19: *2 sc in 1st sc, sc in next 5 sc* rep *-* around (28)
Rnd 20: in BLO, *sc dec, sc in next 2 sc* rep *-* around (21)
STUFF the body of the crayon firmly. To keep the bottom flat, place the crayon on a solid, level surface and use a bamboo skewer to firmly stuff the bottom portion as it sits flat, then stuff the rest of the crayon.
Rnd 21: in FLO, *sc dec, sc in next 5 sc* rep *-* around (19)
Rnd 22: in both loops, *sc dec, sc in next 3 sc, sc dec, sc in next 2 sc* rep *-* 2x (14)
Rnd 23-24: sc in each sc around (14)
Rnd 25: *sc dec, sc in next 2 sc, sc dec, sc in next sc* rep *-* 2x (10)
STUFF the top of the crayon firmly
Rnd 26: sc in each sc around (10)
Rnd 27: in BLO, sc dec around
FO and close up any remaining hole. Bring the end down through the center of the crayon and pull snug to help create that flat plateau at the top of the crayon, the edges of which will be the front loops from Rnd 27.
You can also needle-shape the little shelf transition from main crayon body to crayon tip, which is Rnd 20. Place a few tacking stitches around Rnd 20 and pull just snug to accentuate that shelf.

Highlighter
With white, ch 2 or magic loop
Rnd 1: 8 sc in 2nd ch from hook/loop (8)
Rnd 2: 2 sc in each sc around (16)
Rnd 3: In FLO, sc in each sc around (16)
Rnds 4-5: In both loops, sc in each sc around (16)
Rnd 6: In BLO, *2 sc in 1st sc, sc in next sc* rep *-* around (24)
CHANGE to main highlighter color
Rnd 7: *2 sc in 1st sc, sc in next 2 sc* rep *-* around (32)
Rnd 8: In BLO, *sc dec, sc in next 6 sc* 4x (28)
Rnds 9-22: In both loops, sc in each sc around (28)
STUFF around the donut of negative space formed by the button indent at the bottom of the marker. To keep the bottom flat, place the marker on a solid, level surface and use a bamboo skewer to firmly stuff around the button. Check that the button is still an ‘innie’.
Rnd 23: *sc dec, sc in next 5 sc* rep *-* around (24)
STUFF the body of the marker FIRMLY
Rnd 24: Sc in each sc around (24)
Rnd 25: In BLO, *2 sc in 1st sc, sc in next 5 sc* rep *-* around (28)
Rnds 26-29: In both loops, sc in each sc around (28)
Rnd 30: *2 sc in next sc, sc in next 6 sc* rep *-* around (32)
Rnds 31-32: Sc in each sc around (32)
Rnd 33: In BLO, *sc dec, sc in next 14 sc* rep *-* around (30)
Rnds 34-35: In both loops, sc in each sc around (30)
Rnd 36: In FLO, *sc dec, sc in next 2 sc* rep *-* 7x, sc dec (22)
Rnd 37: In FLO, sc in 1st sc, *sc dec, sc in next sc* rep *-* around (15)
Line the bottom of the marker top with a thin layer of stuffing. You won’t need to stuff the marker top because we’ll be folding it in on itself, and if there’s stuffing in the way, it will pop back out.
Rnd 38: In both loops, *sc dec, sc in next 3 sc* rep *-* around (12)
Rnds 39-42: sc in each sc around (12)

Now for my favorite trick! Pull the loop of your active stitch long so it won’t come undone in the process.
A rundown: The front loops from Rnd 33 are going to become the top rim of the cap. Rnd 36 is going to be the shallowest point on the inside of the cap. Rnd 37 is the beginning of the center button column. We have yet to complete the flat top of the button column.

Put your thumbnails at Rnd 36 and push down into the marker cap until the front loops of Rnd 33 become the rim. Run a finger along the inside of the marker rim like a TSA agent checking a waistband in a pat-down, make sure that everything sits evenly.
Continue working with the cap folded in like this.
Rnds 43-44: Sc in each sc around (12)
STUFF a wad of stuffing into just the stem of the highlighter cap button. If stuffing gets under the folded marker cap area it will pop it all back out.
Rnd 45: In BLO, sc dec around
FO and close up any remaining hole. Bring the end down through the center of the highlighter body and pull snug to help create that flat plateau at the top of the cap button, the edges of which will be the unworked front loops from Rnd 45. It can help to do the same (a small stitch pulled snug) at the bottom of the marker, to keep the bottom button sucked in so we can link the markers together.
You can also place a few tacking stitches around Rnd 36 at the interior of the cap and pull just snug to help make sure the folding we did never pops out. Weave in the ends.


Happy Crocheting!
ABOUT OUR DESIGNER
Brenna Eaves is the one-woman team behind Little Raven Fiber Arts. A self-taught fiber artist with more than 13 years’ experience building things with stitches, she has the type of yarn stash that, if unraveled and tied end to end, would stretch to the moon and back. Though also an accomplished knitter, cross-stitcher, writer, artist, and graphic designer, crochet is her happy place. She lives and works out of Wisconsin.
Facebook / Instagram / Tumblr / Ravelry / Twitter
Add this pattern to Ravelry. Join our CAL group on Facebook.


