


Updated 4/21/2026
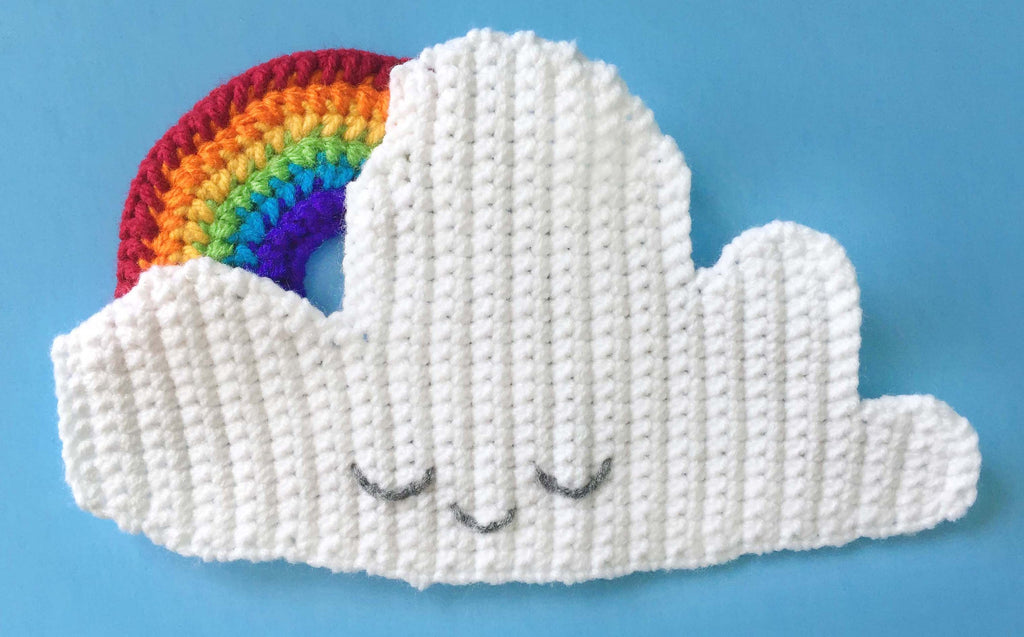
April Showers is a fun and easy project to whip up, no matter the weather! The cloud is worked flat in two pieces and then stitched together, allowing for the easy inclusion of additions like lightning or a bright rainbow poking out. Happy spring!

SUPPLIES
- Yarn: Red Heart Super Saver Solids WW yarn
- Hook: Furls Odyssey II Crochet Hook US G 4.0mm
- Fishing line (I used low memory 6lb 0.23mm line) or sewing thread
- Stuffing
- Skewer for stuffing (optional)
- Tapestry needle
- Sewing needle
- 9mm black safety eyes, or scrap yarn for embroidery
PATTERN DETAILS
Finished Size
About 8.5” (21.5cm) wide and 5” (12cm) tall (just the cloud), raindrops are each about 1.5” (3.5cm) tall.
Stitches Used
Ch = chain, Sc = single crochet, Sc dec = single crochet decrease, Slp st = slip stitch
Other Abbreviations
Rep = repeat
Pattern Notes
- Do not chain 1 at the beginning of rows unless otherwise instructed. When working in the round, do not join with a slip st or ch 1 at the beginning of rounds. Use a stitch marker to mark your rounds.
- Finished size about 8.5” (21.5cm) wide and 5” (12cm) tall (just the cloud), raindrops are each about 1.5” (3.5cm) tall.
Add this pattern to your Ravelry Favorites
Join our CAL Group, Fun with Furls
PART ONE
For part one, we’ll be making our cloud panels and deciding on a face. For part two, we’ll make it rain, even get a little stormy with a lightning bolt, and maybe we’ll see a rainbow peek out from the clouds!
Cloud panels (make 2)
Ch 9
Row 1: sc in 2nd ch from hook and in last 7 sc, TURN (8)
Row 2: 2 sc in 1st sc, sc in next 6 sc, 2 sc in last sc, TURN (10)
Row 3: sc in each sc across, TURN (10)
Row 4: 2 sc in 1st sc, sc in next 8 sc, 2 sc in last sc, TURN (12)
Row 5: 2 sc in 1st sc, sc in next 10 sc, 2 sc in last sc, TURN (14)
Row 6-8: sc in each sc across, TURN (14)
Row 9: sc in 1st 12 sc, sc dec, TURN (13)
Row 10: sc in each sc across, TURN (13)
Row 11: 2 sc in 1st sc, sc in next 10 sc, sc dec, TURN (13)
Row 12: sc dec, sc in last 11 sc, TURN (12)
Row 13: sc in 1st 10 sc, sc dec, ch 8, TURN (11)
Row 14: 2 sc in 2nd ch from hook, sc in next 5 ch, sc dec in last ch and next sc, sc in last 10 sc, TURN (17)
Row 15: 2 sc in 1st sc, sc in next 16 sc, 2 sc in last sc, ch 5, TURN (18)
Row 16: 2 sc in 2nd ch from hook, sc in next 2 ch, sc dec over last ch and next sc, sc in last 19 sc, TURN (22)
Row 17: sc in each sc across, TURN (24)
Row 18: 2 sc in 1st sc, sc in last 23 sc, TURN (25)
Row 19-23: sc in each sc across, TURN (25)
Row 24: sc dec, sc in last 23 sc, TURN (24)
Row 25: sc in each sc across, TURN (24)
Row 26: sc dec, sc in last 22 sc, TURN (23)
Row 27: sc in 1st 21 sc, sc dec, TURN (22)
Row 28: sc dec, sc in next 20 sc, TURN (21)
Row 29: sc in 1st 19 sc, sc dec, TURN (20)
Row 30: sc dec, sc in last 18 sc, TURN (19)
Row 31: sc in 1st 14 sc, TURN (14)
Row 32: 2 sc in 1st sc, sc in last 13 sc, TURN (15)
Row 33: sc dec, sc in next 12 sc, 2 sc in last sc, TURN (15)
Row 34: 2 sc in 1st sc, sc in last 14 sc, TURN (16)
Row 35-36: sc in each sc across, TURN (16)
Row 37: sc in 1st 14 sc, sc dec, TURN (15)
Row 38: sc dec, sc in last 13 sc (14)
Row 39: sc dec, sc in next 5 sc, TURN (6)
Row 40: 2 sc in 1st sc, sc in last 5 sc, TURN (7)
Row 41-42: sc in each sc across, TURN (7)
Row 43: sc dec, sc in next 3 sc, sc dec, TURN (5)
Row 44: sc dec, sc in next sc, sc dec (3)
FO and weave in ends.
On one of the cloud panels (or both, if you want it to be reversible), place the eyes between rows 15-16 and 21-22, about 6 or 7 sc up from the bottom edge.
Alternatively, you could use scrap yarn to embroider a face, like I did with Thunder and Bowie.

PART TWO
Time to make it rain! Try using a variegated blue yarn for some fun “tie-dye” raindrops. For a stormier mood, we’ll also cover how to make a little lightning bolt, and for when the storm passes, we’ll make a rainbow!

Raindrops - make as many as you want (I made 6)
Ch 2 or magic loop
Rnd 1: 7 sc in 2nd ch from hook / loop (7)
Rnd 2: 2 sc in each sc around (14)
Rnd 3-5: sc in each sc around (14)
Rnd 6: *sc dec, sc in next 3 sc* rep *-* 2x, sc dec, sc in last 2 sc (11)
Rnd 7: *sc dec, sc in next sc* rep *-* 3x, sc dec (7)
STUFF the raindrop firmly
Rnd 8: sc dec around
FO and weave in the ends.
Lightning bolt panels - make 2
With yellow, ch 7
Row 1: sc in 2nd ch from hook and in each ch across, TURN (6)
Row 2: sc in each sc across, TURN (6)
Row 3: sc dec, sc in next 3 sc, 2 sc in last sc, TURN (6)
Row 4: 2 sc in 1st sc, sc in next 3 sc, sc dec, TURN (6)
Row 5: sc dec, sc in next 4 sc, ch 3, TURN
Row 6: 2 sc in 2nd ch from hook, sc in next ch, sc in next sc, 2 sc in next sc, TURN leaving remaining 3 sc unworked (6)
Row 7: 2 sc in 1st sc, sc in next 3 sc, sc dec, TURN (6)
Row 8: sc dec, sc in last 4 sc, TURN (5)
Row 9: 2 sc in 1st sc, sc in next 2 sc, sc dec, TURN (5)
Row 10: sc dec, sc in last 3 sc, TURN (4)
Row 11: 2 sc in 1st sc, sc in next sc, sc dec, TURN (4)
Row 12: sc dec, sc in last 2 sc, TURN (3)
Row 13: sc in 1st sc, sc dec, TURN (2)
Row 14: sc dec
FO and weave in ends.
Match the lightning panels together. With yellow, starting at the top left side of the bolt and working through both panels, sc the edges together. At corners and points, sometimes it helps to work ‘sc, ch 1, sc’ in one space to create more of a point. You won’t need to sc the foundation chain edges together, so FO when you get back to the top of the bolt.

Lay out your front-facing thundercloud panel and use sewing pins to mark where you want the lightning bolt to fit. Using grey, match both cloud panels together and starting at the foundation chain side of the clouds, begin to sc the panels together. Only sc as far as the first pin, FO, then reattach the yarn at the second pin and continue to sc the cloud panels together across the bottom, as shown.
To secure the lightning bolt in place, fit it in its slot and use the grey tail ends at the opening to sew across the top of the lightning bolt. The first row of the bolt shouldn’t be visible, it should be up inside the cloud.
Now that we’ve closed up the whole bottom edge of the cloud, it’s time to add the raindrop strings before we go any further.
ADDING THE RAINDROPS
You can arrange the raindrops beneath the cloud to determine how you want to string them together. Since I made six, I arranged mine in three collections of twos.

Cut three good lengths of fishing line (or sewing thread) and tie one end of each to the top of a raindrop. If using fishing line, make sure your knots means business. You can hide the short end away inside the raindrop and trim it.
Thread a second raindrop onto each string like a bead, about an inch and a half above the first raindrop. Tie a knot, or a few knots, at the top of the second raindrop to secure it in place. Remember, if this is fishing line, make sure those knots aren’t kidding around.

Now bring the raindrop strings up through the sc seam of the bottom of the cloud, wherever you’d like, and tie them to one of the panels on the inside. You can then weave the fishing line (or thread) up through some of the stitches of the cloud panel and trim; don’t weave it in and just trim; or leave it since it will end up in the stuffing anyway.
Continue to sc the cloud panels together, stuffing as you go to make sure you can get stuffing into each of those little cloud floofs to pad them out. Once you close up, FO and weave in any remaining ends.
Take a scrap of your cloud color and tie the ends together to create a loop of yarn. Attach this to the top of the cloud for hanging, and you’re done!
PART THREE
Rainbow panels - make 2
With purple and starting with a long tail, ch 13
Row 1: hdc in 3rd ch from hook and in next 2 ch, *2 hdc in next ch, hdc in next 3 ch* rep *-* across, TURN
Change color to BLUE
Row 2: ch 1, hdc in next 4 sts, 2 hdc in next st, hdc in next 3 sts, 2 hdc in next st, hdc in last 4 sts, TURN
Change color to GREEN
Row 3: ch 1, hdc in next 5 sts, 2 hdc in next st, hdc in next 3 sts, 2 hdc in next st, hdc in last 5 sts, TURN
Change color to YELLOW
Row 4: ch 1, hdc in next 6 sts, 2 hdc in next st, hdc in next 3 sts, 2 hdc in next st, hdc in last 6 sts, TURN
Change color to ORANGE
Row 5: ch 1, hdc in next 7 sts, 2 hdc in next st, hdc in next 3 sts, 2 hdc in next st, hdc in last 7 sts, TURN
Change color to RED
Row 6: ch 1, hdc in next 4 sts, *2 hdc in next st, hdc in next 5 sts* rep *-* 2x, 2 hdc in next st, hdc in last 4 sts
FO with a long tail and trim all the ends except the long red and purple, we’ll use those.
Match the two rainbow panels together and use the red end to whipstitch the top of the rainbow together, then the purple to whipstitch the bottom closed. You won’t need to secure the sides of the rainbow, those will be hidden by the cloud.
Use sewing pins to mark where you want the rainbow to fit, and only mark where the red meets the cloud. We’ll just whipstitch that little gap under the purple part closed.
Match both cloud panels together and, starting at the foundation chain side of the clouds, begin to sc the panels together. Don’t forget to add the raindrop strings after completing the bottom, and then stuff as you go.
Close up like this as far as the first pin marker: FO, then reattach the yarn at the second pin marker and continue to sc the cloud panels together. When you come all the way back around, add any last additional stuffing and then FO.
To secure the rainbow in place, fit it in its designated space and use the white tail ends at the opening to sew across the bands of the rainbow and also to close up the little gap in the cloud beneath the purple.
Take a scrap of your cloud color and tie the ends together to create a loop of yarn. Attach this to the top of the cloud for hanging, and you’re done!
ABOUT OUR DESIGNER
Brenna Eaves is the one-woman team behind Little Raven Fiber Arts. A self-taught fiber artist with more than 13 years’ experience building things with stitches, she has the type of yarn stash that, if unraveled and tied end to end, would stretch to the moon and back. Though also an accomplished knitter, cross-stitcher, writer, artist, and graphic designer, crochet is her happy place. She lives and works out of Wisconsin.


