

Updated 10/14/2025


SUPPLIES
- US – J, 6.0mm Furls hook
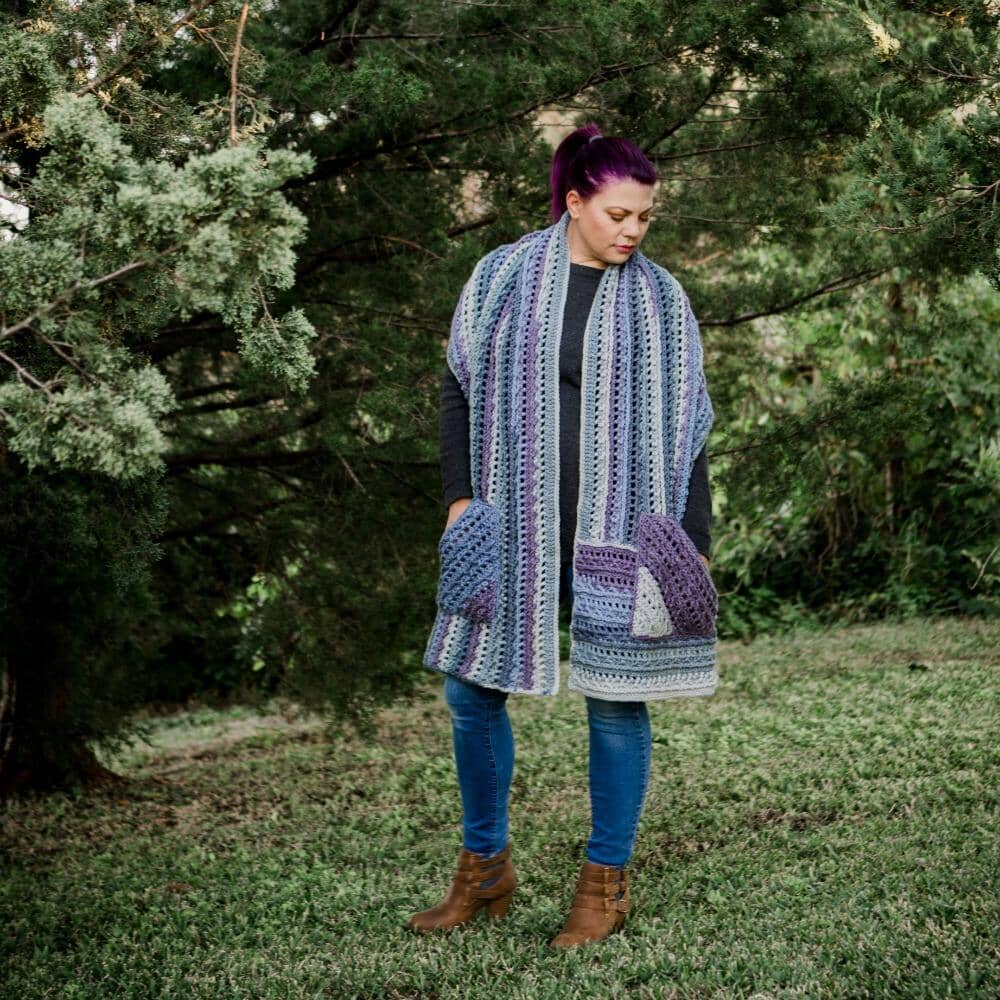
- 1700 yds Caron Lovely Layers Cakes Yarn (4 – Worsted; 80% acrylic, 20% wool; 8.5 oz/ 240 g; 445 yds/ 407). Colorway shown: Sugar Plums (4 cakes used)
PATTERN DETAILS
Finished Size
79” x 21”
Gauge
14 sts x 9 rows =4” in pattern
Gauge Pattern
Row 1 [WS]: Fdc 21; turn. (21 dc)
Row 2 [RS]: Csdc in first st, *ch 1, skip next st, dc in next st; rep from * across, turn. (21 dc)
Row 3: Csdc in first st, dc in next ch, *fpdc around next dc, dc in next ch; rep from * across until 1 st rem, dc in last dc, turn. (21 sts)
Row 4: Csdc in first st, *skip next st, dc in next 2 sts, fpdc around skipped st working in front of the previous sts, dc in next dc; rep from * across, turn.
Row 5: Csdc in first st, fpdc around each rem st until 1 st rem, dc in last st; turn.
Rep Rows 2 -5 to desired height
Abbreviations Used
Ch – Chain
Dc – double crochet
Rem – Remains or remaining
Rep – Repeat
RS – Right side
St(s) – Stitch(es)
WS – Wrong side
YO - Yarn Over
Special Stitches
FDC - Foundation Double Crochet - tutorial
The First FDC Stitch: Ch 3. Yo and insert hook into the chain furthest from the hook, yo, and pull up a loop. Yo and pull through the first loop on the hook. This acts as the starting ch for this stitch. Yo and pull through two loops, yo and pull through the last two loops on the hoop, as when making a dc stitch. This completes the first FDC. Subsequent FDC Stitches: Yo and insert hook into the V at the bottom of the previous stitch. Yo and pull up a loop, then yo and pull through the first loop on the hook. Yo and pull through two loops, yo and pull through the last two loops on the hoop, as when making a dc stitch.
CSDC- Chainless Starting Double Crochet- tutorial
Pull up the loop on the hook to the height of a dc st, yo with the loop itself, insert the hook into the first st, yo and pull up a loop, yo and pull through first loop and behind the tall loop, yo and pull through the last two loops to finish the stitch.
Fpdc- Front Post Double Crochet- tutorial
yo and insert hook from front to back around the post of the indicated st, yo and pull up a loop, yo and pull through two loops, yo and pull through last two loops to finish the st.
Notes
Will appear with each section of the instructions

PART ONE
Ready to get started? In the first part of the Sugar Plum Wrap, we make the majority of the shawl itself – but don’t break your yarn when you’re done! Relax and enjoy this four row repeat, and the self-striping effects of Caron Cakes!
NOTES
- If you prefer to skip the Fdc, you can instead work Row 1 as follows: Ch 231, dc in the 4th ch from the hook, dc in each rem ch to end; turn. (229 sts)
- If you prefer to skip the Csdc, you can instead ch 3 and count that as the first dc of the row.
Row 1 [WS]: Fdc 229; turn. (229 dc)
Row 2 [RS]: Csdc in first st, *ch 1, skip next st, dc in next st; rep from * across, turn. (115 dc)
Row 3: Csdc in first st, dc in next ch, *fpdc around next dc, dc in next ch; rep from * across until 1 st rem, dc in last dc, turn. (229 sts)
Row 4: Csdc in first st, *skip next st, dc in next 2 sts, fpdc around skipped st working in front of the previous sts, dc in next dc; rep from * across, turn.
Row 5: Csdc in first st, fpdc around each rem st until 1 st rem, dc in last st; turn.
Rows 6 – 45: Rep Rows 2 -5.
Row 46: Rep Row 2.
Row 47: Csdc in first st, dc in each rem st to end; turn.
Row 48: Ch 1, sc in each st across; do NOT turn.
Meet us back here, next Tuesday, for Part Two

PART TWO
Let’s finish up our Sugar Plum Wraps! In Part 2 we turn the corner and add those horizontal rows on the ends. Then it’s on to the pockets, and we’re done! Be sure to try the wrap on before you sew the pockets, so you can adjust them for your own height as needed. Feel free to add tassels or fringe or even decorative buttons to personalize your Wrap.
NOTES
- Rnd 1 works around 3 sides of the piece, and, the pattern returns to Rows.
- If you prefer to skip the Csdc, you can instead ch 3 and count that as the first dc of the row.
Turn work 90 degrees to work along the ends of the previous rows.
Rnd 1 [RS]: Ch 1, sc evenly across ends of rows, ch 1, sc in each foundation ch across, ch 1, sc 73 evenly across other ends of rows stopping at Row 47; turn.
Row 2: Csdc in first st, fpdc around each rem st until 1 st rem, dc in last st; turn. (73 sts)
Row 3: Csdc in first st, *ch 1, skip next st, dc in next st; rep from * across, turn. (37 dc)
Row 4: Csdc in first st, dc in next ch, *fpdc around next dc, dc in next ch; rep from * across until 1 st rem, dc in last dc, turn. (73 sts)
Row 5: Csdc in first st, *skip next st, dc in next 2 sts, fpdc around skipped st working in front of the previous sts, dc in next dc; rep from * across, turn.
Row 6: Csdc in first st, fpdc around each rem st until 1 st rem, dc in last st; turn.
Rows 7 – 26: Rep Rows 3 – 6.
Edging Section 1: Ch 1, sc evenly across sides of Rows of Part 2; join with a sl st to first st of Row 48, fasten off.
Edging Section 2: Rejoin yarn on the other side of Part 2 rows from RS, ch 1, sc evenly across sides of rows, ch 2; join with a sl st to first st of Part 2 Row 26.
Pockets: Make 2
Row 1: Ch 2 (does not count as a st), 3 dc in first ch made; turn. (3 dc)
Row 2: (Csdc, dc) in first st, ch 1, dc in next st, ch 1, 2 dc in last st; turn. (5 dc)
Row 3: (Csdc, dc) in first st, [fpdc around next st, dc in next ch] twice, fpdc around next st, 2 dc in last st; turn. (9 sts)
Row 4: (Csdc, dc) in first st, *skip next st, dc in next 2 sts, fpdc around skipped st, dc in next st; rep from * across, dc again in last st, turn. (11 sts)
Row 5: (Csdc, dc) in first st, fpdc around each rem st until one st rem, 2 dc in last st; turn. (13 sts)
Row 6: (Csdc, dc) in first st, *ch 1, skip next st, dc in next st; rep from * across, dc again in last st, turn. (9 dc)
Row 7: (Csdc, dc) in first st, *fpdc around next dc, dc in next ch; rep from * until 2 sts rem, fpdc around next st, 2 dc in last st, turn. (17 sts)
Rows 8 – 15: Rep Rows 4 – 7.
Row 16: Rep Row 4.
Row 17: Ch 2, dc2tog in first 2 sts, fpdc around each rem st until 2 sts rem, dc2tog in last 2 sts; turn. (33 sts)
Row 18: Ch 2, dc2tog in first 2 sts, *ch 1, skip next st, dc in next st; rep from * until 3 sts rem, ch 1, skip next st, dc2tog in last 2 sts; turn. (16 sts)
Row 19: Ch 2, dc2tog in first st and ch, *fpdc around next st, dc in next ch; rep from * until 2 dc rem, fpdc around next st, dc2tog in last ch and st; turn. (29 sts)
Row 20: Ch 2, dc2tog in first 2 sts, *skip next st, dc in next 2 sts, fpdc around skipped st, dc in next st; rep from * until 3 sts rem, skip the next st, dc2tog in last 2 sts; turn. (26 sts)
Row 21: Ch 2, dc2tog in first 2 sts, fpdc around each rem st until 2 sts rem, dc2tog in last 2 sts; turn. (24 sts)
Pocket Edging: Ch 1, sc evenly around pocket, working ch 2 at each corner; join and fasten off.

Assembly Instructions
Block shawl to 79” x 21”.
Sew pockets to shawl with remaining yarn and yarn needle, at each end, as shown – approximately 4.5” from each end, centered width-wise – or in location desired.

ABOUT OUR DESIGNER
Tamara Kelly is the designer and creative mind behind Moogly! Moogly is world-famous for fresh, modern, and approachable crochet designs – as well as a little knitting and crafting here and there. Tamara is also the author of Quick Crochet for the Home, and has designed for several crochet magazines. On Moogly, you’ll find several new free patterns every month, top quality video tutorials, giveaways, and more. There's a new post almost every weekday, and a free newsletter on Saturdays too, full of special extras!
Follow Tamara
Blog | Facebook | Ravelry | Instagram | Pinterest


