Hi, Furlers!
My focus has shifted in a soul-shaking way the past few weeks--a way in which I don't think I will ever return to the person I was a month ago. For the past four weeks, the city of Baltimore, like the rest of the world, has dealt with a global pandemic that has reached it’s darkness into my life in a very real way. I am a mom, a wife, and a maker—but I am also a medical professional. It has been both devastating and incredibly inspiring to see my coworkers and peers soldier on through this frightening time, dealing with multiple personal crises while focusing on our patients and treatment of the CoVID-19 pandemic.
Through all this, I have been pouring my heartache for my medical professional cohorts, my worry for my neighbor who lost his job three weeks ago, my fear for my daughter who has respiratory issues, and the creeping terror that I may bring this horrible virus home to my family every night into a design for Furls , who graciously sent me the most beautiful yarn to work with.

My gift to all of you--my friends, my people, my encouragement and support-- is a Knit-A-Long for the month of April through the Furls Fiber Arts website. The Laomai Tapestry is worked in sections- as I processedfeelings of fear, worry, exhaustion, and a soaring love for my fellow humans- that involves simple but beautiful knitting techniques like lace work and mosaic knitting to expand your stitching knowledge and occupy your mind. Laomai is a Greek word meaning “to heal, cure, restore; to bring safely through.” I will pray this word over us all as we stitch #AloneTogether.
I hope you’ll join me. I hope you will find a moment of peace, or joy in the stitchwork, or even just a minute to sit down with this project. My love to each and every one of you!
Sincerely,
Rachael
ABOUT OUR DESIGNER
Hi, I’m Rachael! AddisonJames Knits, named for my two kids, has been around since 2009 (with a name change or two). I’m a knitter and crocheter, a Medical Laboratory Scientist, a mom to humans and dogs, chocolate-obsessed, and coffee-fueled. I’m on an imperfect journey towards minimalism, mindfulness and surrounding myself with small and large experiences and pieces that feel luxurious and bring happiness to myself and my loved ones. One of the only things I love more than yarn and creating beautiful pieces is the connections that happen between makers who discover each other through their mutual love of craft and develop friendships, meaningful interactions, and “me too!” moments. Please say hi, whether it’s in person or online...I promise I’ll have a #momfail story that’ll make you laugh and a big southern hug for you!
Follow Rachael
Instagram | Blog | Ravelry | Etsy

SUPPLIES
Yarn
Furls Whims Merino Worsted (100g / 3.5 oz, 94 yds / 86 m): one skein each in White and Charcoal
Materials
US Size 9/5.5 mm circular knitting needles
Yarn needle
Scissors
Dowel rod or long, thin branch to attach wall hanging (My stick was approximately 25” long)
PATTERN DETAILS
Notes
- Gauge is not essential for this wall hanging.
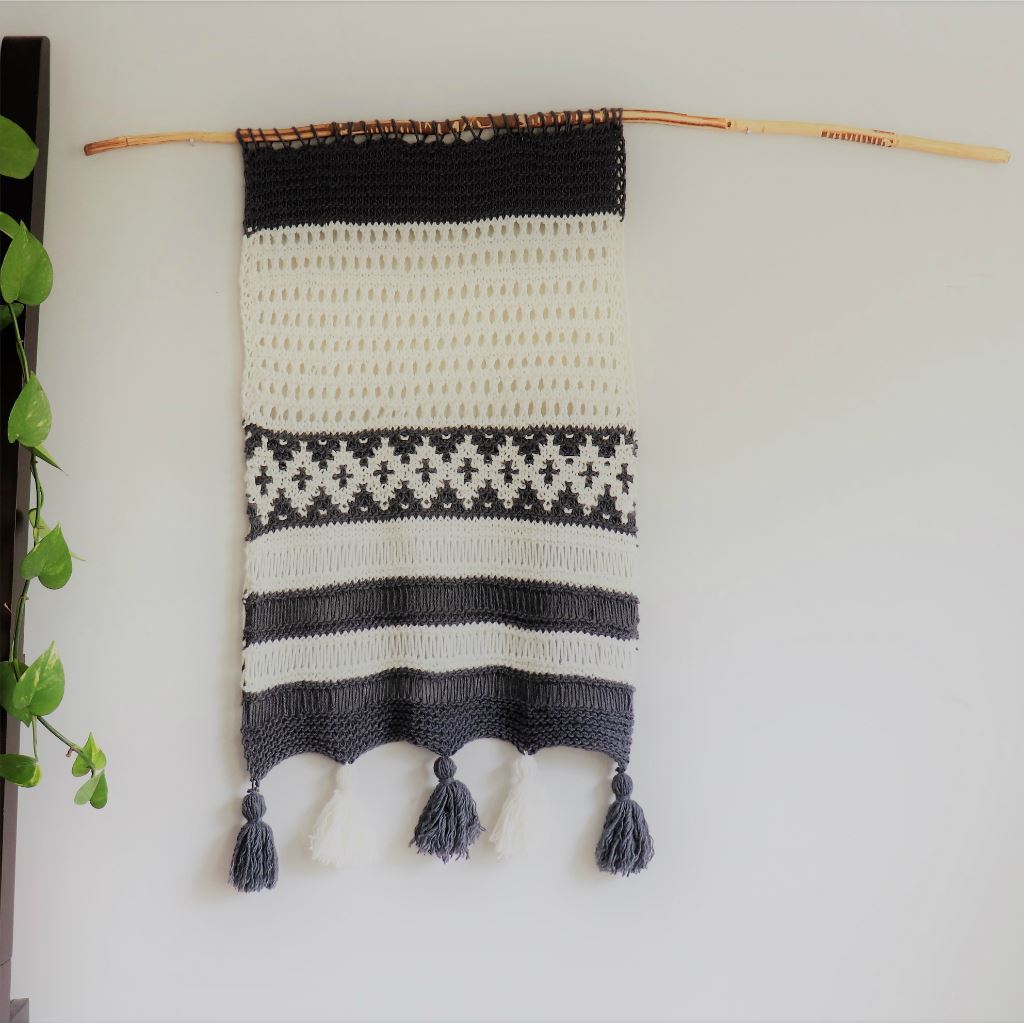
Finished size after blocking
24” long X 15” wide
PART ONE
-Cast on, garter stitch panel & lace panel
Terminology: WS = wrong side, RS= right side, sl=slip stitch as if to purl, WYIF =With yarn in front, AITP = as if to purl, YO=Yarn over, K2tog=Knit 2 sts together
Let’s Get Started!
With your circular needles and Color A (charcoal), cast on 61 sts.
Row 1: With yarn in front (WYIF), slip first stitch as if to purl (This will keep the edges of our wall hanging neat!) Take yarn to back of work, K remaining sts (61).
Row 2-12: Repeat Row 1 (61).
Row 13: change to Color B (white). Repeat row 1 (61).
Row 14: (WS) WYIF, sl first st. Move yarn to back, K 2 sts, *YO, K2tog.* Repeat * - * to last 2 sts. K last 2 sts. (61).
Row 15-17: WYIF, sl first st. K remaining sts across (61).
Row 18-45: Repeat Rows 14-17 another 7 times, for 8 lace row repeats total.
Row 46: (WS) Change to Color A (charcoal). WYIF, sl first st. Move yarn to back, K remaining sts (61)
Great job! You’ve finished the garter stitch panel and the lace section, and set up for the next panel!
Next week, we will begin the mosaic knit panel...can’t wait to see you there! Be sure to post your #WIP (Work In Progress) pics of your wall hanging on social media and tag me @addisonjamesknits ! I love seeing your makes, and featuring them in my Instagram stories!
PART TWO
Mosaic Knitting panel
This intricate, stunning section of the wall hanging is created with mosaic knitting-- using only knit stitch, slip stitch, and zero switching colors in the row you are knitting! Mosaic knitting is by far the easiest way to create graphic colorwork that looks deceptively complicated. Shh...Only you will know the secret!
The diamond-and-cross mosaic pattern uses a multiple of 6 sts plus 1 st (hence our original cast-on number of 61 sts). Odd-numbered rows are the “right side” (RS); even-numbered rows are the “wrong side” (WS).
In mosaic knitting, the even-numbered rows are what I like to call “cheater rows”-- they are SO easy to work, because you simply follow the color pattern you made on the row before!
Remember to keep your tension loose as you work this section; mosaic knitting depends on slip stitches for the color changes, so the yarn loops will be pulled a little tight sometimes. Keeping your tension loose will allow your design to lay flat and unpuckered when you block your wall hanging! Don’t worry if this section seems narrower in width than your last section—again, blocking fixes a lot!
Most importantly: ALL sts are slipped purl-wise with yarn always held to the wrong side of your work. So, if you are working on a RS row, your yarn will always be held to the back when slipping sts. If you are working on a WS row, your yarn will always be held to the front when slipping sts, because you are on the wrong side of the work. Do not cut your yarn at the end of any rows in the mosaic knitting section.
Let’s get started!
You should have a row of Color A (charcoal) from last week’s directions, which will set up for the mosaic pattern.
Row 1: (RS) With Color B (white), K1, *sl 2, K1*. Repeat to end of row (61). Your slipped sts will be the color of the row underneath.
Row 2: (WS) Repeat Row 1, knitting all color B sts and slipping all color A sts (it’s like a cheat row!)
Row 3: (RS) With Color A (Charcoal), K3, sl1, *K5, sl1*. Repeat * - * to last three sts, K3 (61).
Row 4: (WS) Repeat Row 3.
Row 5: (RS) With Color B, sl2, K3, *sl3, K3* Repeat * - * to last 2 sts, sl2 (61).
Row 6: (WS) Repeat Row 5.
Row 7: (RS) With Color A, K2, sl3, *K3, sl3* Repeat * - * to last 2 sts, K2 (61).
Row 8: (WS) Repeat Row 7.
Row 9: (RS) With Color B, sl1, *K5, sl1* Repeat * - * to end of row (61).
Row 10: (WS) Repeat Row 9.
Row 11: (RS) With Color A, K1, *Sl2, K1* Repeat * - * to end of row (61).
Row 12: (WS) Repeat Row 11.
Row 13: (RS) With Color B, K3, sl1, *K5, sl1* Repeat * - * to last three sts, K3 (61).
Row 14: (WS) Repeat Row 13.
Row 15: (RS) With Color A, sl2, K3, *sl3, K3 * Repeat * - * to last 2 sts, sl2 (61).
Row 16: (WS) Repeat Row 15.
Row 17: (RS) (RS) With Color B, K3, sl1, *K5, sl1* Repeat * - * to last three sts, K3 (61).
Row 18: (WS) Repeat Row 17.
Row 19: (RS) With Color A, K1, *Sl2, K1* Repeat * - * to end of row (61).
Row 20: (WS) Repeat Row 19.
Row 21: (RS) With Color B, sl1, *K5, sl1* Repeat * - * to end of row (61).
Row 22: (WS) Repeat Row 21.
Row 23: (RS) With Color A, K2, sl3, *K3, sl3* Repeat * - * to last 2 sts, K2 (61).
Row 24: (WS) Repeat Row 23.
Row 25: (RS) With Color B, sl2, K3, *sl3, K3* Repeat * - * to last 2 sts, sl2 (61).
Row 26: (WS) Repeat Row 25.
Row 27: (RS) With Color A, K3, sl1, *K5, sl1*. Repeat * - * to last three sts, K3 (61).
Row 28: (WS) Repeat Row 27.
Row 29: (RS) With Color B, K1, *sl 2, K1*. Repeat to end of row (61).
Row 30: (WS) Repeat Row 29.
Row 31-32: With Color A, K all sts across (61).
Congrats...you have mastered mosaic knitting! Next time, meet me back here for the last part (and probably my favorite stitch!) of our wall hanging pattern, plus blocking tips and tassels!
Be sure to post your #WIP (Work In Progress) pics of your wall hanging on social media and tag me @addisonjamesknits ! I love seeing your makes, and featuring them in my Instagram stories!
PART THREE
Hi Furlers!
Welcome to my favorite section of the wall hanging--the Drop Stitch lace pattern. It looks intricate, sounds complicated, but is MIND-BLOWINGLY SIMPLE. I mean, look at the work you just finished in section two...you know how to knit in mosaic stitch now, amazing! And that was pretty easy, right? Just wait until you start this final section. I promise you'll fall in love with the knit drop stitch too....and the best part, it goes crazy fast!

I’ve created a quick YouTube video tutorial showing how to knit the Drop Stitch, for you visual learners...just scroll down to the video below the pattern!
Let's Go!
Attach Color B (cream) to your work on the RS.
Row 1: (RS) With Color B (cream), K all sts across (61).
Row 2: (WS) K all sts across (61).
Row 3: Repeat Row 1.
Row 4: Repeat Row 2 (you should have four rows of knitting total in Color B).
Row 5: (RS) K, wrapping yarn twice around needle for each st. You will have an extra "wrap" in between each knitted stitch, so it will seem as if you have double the amount of stitches on your needle. Don't worry! Keep going. :) This is your "Drop Stitch Set Up Row."

Row 6: (WS) K, dropping extra wrapped sts as you come to them (61).
Try to keep your tension consistent, but don't worry about your dropped stitches being uneven--by wrapping them in the last row, you've essentially pre-measured each dropped stitch, so it will come out evenly after you drop it in this row! Knit a few stitches and then give the work a gentle tug and you’ll see what I mean!

Row 7: (RS) K all sts across (61).
Row 8: (WS) K all sts across (61).
Row 9: (RS) Attach Color A (charcoal), K all sts across (61).
Row 10: (WS) K all sts across (61).
Row 11: (RS) *Drop St Set Up Row*: K, wrapping yarn twice around needle for each st.
Row 12: (WS) K, dropping extra wrapped sts as you come to them (61).
Row 13: (RS) K all sts across.
Row 14: (WS) K all sts across.
Row 15-20: Attach Color B (cream), Repeat rows 3-8.
Row 21-26: Attach Color A (charcoal), Repeat rows 9-14.
You should now have four color blocked sections of the drop stitch pattern!
Let's finish up by adding a few more rows of garter stitch to match the top of our tapestry.
Row 27-34: K all sts across (61).
Bind off all sts loosely (keeping in same tension as your previous knit rows).
Here’s the video for the Drop Stitch Lace tutorial: AJK Easy Knit Drop Stitch tutorial
....aaaaand CONGRATULATIONS! Just take a second and look at your beautiful work. Do you love the drop stitch now? Especially with that squishy textured garter stitch in between?! I sure hope so. ;)
Next, find a teensy bit of patience deep down in your soul, because you're going to want to block this gorgeous piece of art. I know, I KNOW! You just wanna get it up on your wall! I promise you, don't skip this step, and you'll be so happy you did it. Blocking will even out every one of those pretty little stitches, and do wonders with shaping up the borders of the tapestry. Especially that mosaic section, where the edges kind of pull in a bit? Wave that magical blocking wand, and bibbity-bobbity-BOOM, the edges are even and polished!
I soak my tapestry for about 10 minutes in a small sinkful of cool water and a wool wash, but a drop of gentle dish detergent or even hair conditioner will work (and smell delightful, ha!)
Gently squeeze out your wall hanging (don't wring it, but try to get out all the excess water), and lay it flat on a towel or a blocking mat. Next, manhandle that thing a little! Don't be scared to stretch it out a bit, and get the sides lined up nicely. You won't hurt it, I promise! I gently but firmly pull width-wise on the mosaic tapestry section, then grip the top and bottom of the same mosaic part and pull longways a little. Go back and stretch it width-wise again, and line up the edges of the mosaic knitting section to your other sections' edges. Pin the heck out of the piece after you get it all lined up pretty with itself, and let it dry.
After it's dry and off the blocking mats, let's attach some tassels or fringe! It's totally up to you. I usually am a fringe-aholic, but I love a good fat fluffy tassel on a wall hanging. Either way--you're the boss of your knitting, right?! Do what makes your heart happy.

Scroll down for the YouTube video tutorial on how I make yarn tassels! I like to make my tassels with a cardboard toilet paper roll cut in half lengthwise, or a stiff piece of cardstock (I've even wrapped yarn around a coaster when I couldn't find anything else!). I usually wrap my yarn around 30 times, cut the yarn, and tie a tight knot around one of the ends, leaving the two tails long (about 6 inches). Carefully slide the wrapped bundle off the cardboard, and holding the knotted tails with one hand, form a little "head" near the knot and wrap another piece of yarn around the bundle several times. tie off tightly, and then simply cut the loops at the opposite end of the tassel with scissors. Give it a little trim if the fringed ends need to be evened up, and knot your tassel to the bottom of your tapestry! I used the charcoal yarn to make three tassels and the cream yarn to make two, but you can make as many or as few as you'd like, depending on how much yarn you have left!
I’ve created a quick YouTube tutorial showing you how to make tassels the AJK way! Check it out here: Easy Tassel Tutorial by AJK
The last step is to attach your Laomai Tapestry to a stick, dowel rod, or simply pin it up on your wall!

I am so happy, grateful and humbled that you would take the time to create this piece with me. It meant so much to me as I was knitting during a scary and confusing time, and the Laomai Tapestry brought peace and calmness to my frazzled soul. I hope you’ve found it to do the same for you!
Remember that Laomai is a Greek word meaning “to heal, cure, restore; to bring safely through.” I will pray this word over us all as we stitch #AloneTogether.
Be sure to post your WIP pics of your wall hanging on social media, and tag me @addisonjamesknits along with the #Laomaitapestry and #LaomaitapestryKAL tags! I love seeing your makes, and featuring them in my Instagram stories!
-Rachael