

Hi again everyone! I am J.A. Poolvos from Little Bear Crochets. This week we continue the project that we started last week. If you missed the earlier post, you can view the previous steps here.

Last week we made the head, body, legs and tail. That means that this week we’ll continue with the arms, snout, ears and extra decorations. Let’s go!
Arms (make 2)
Use blue yarn
Round 1: 6 in a m.c. [ 6 ]
Round 2: sc around [ 6 ]
Remember, stuff a little after every few rounds while crocheting.
Round 3-11: sc around [ 6 ]
Push the two open sides together and close the hole with two crochet stitches. Then finish off and leave a long thread for sewing.
Sew the two arms to both sides of the elephant body, just below the neck, just above the row in which you changed colors for the first time in the body.

Snout
Use blue yarn
Round 1: 5 in a m.c. [ 5 ]
Round 2: BLO- Sc around [ 5 ]
Round 3: inc, sc [ 6 ]
Round 4: sc around [ 6 ]
Remember, stuff a little after every few rounds while crocheting.
Round 5: sc around [ 6 ]
Round 6: inc, 5 sc [ 7 ]
Round 7-8: sc around [ 7 ]
Round 9: 2sc, inc, 3 sc, inc [ 9 ]
Round 10: sc around [ 9 ]
Round 11: 4sc, inc, 4sc [10]
Finish off and leave a long thread.
For the snout, we will use some metal wire to make it bendable. Here I use some metal wire that I found in a DIY store. It’s meant to use in gardens, but it works. You don’t have to be too picky about your wire: if you can bend it, but it’s still pretty firm, then it will work. If you’re making this plush for a very young child, I’d advise you to skip the wire, just to be safe!

Cut off a piece of metal wire that is about the size of your stuffed snout. Now fold it. This will result in a side with a soft curve, and a side with two sharp ends. Push the side with a soft curve into the snout, until only about 0.5 cm (0.2 inches) of the sharp ends remain outside of the snout. Stick these sharp endings into the front of the face of the elephant, until round 11 of the snout touches the face. Now sew the snout the face like you would do normally.
By following this process, you ensure that a piece of the metal wire is in the snout, but also in the face. This makes it really bendable, but also secure, so the snout doesn’t give into gravity that easily!

Ears (make 2)
Use blue yarn
Round 1: 6 in a m.c. [ 6 ]
Round 2: (inc) x 6 [12]
Round 3: (sc, inc) x 6 [18]
Round 4: (2 sc, inc) x 6 [24]
Round 5: (3 sc, inc) x 6 [30]
Round 6: (4 sc, inc) x 6 [36]
Round 7: (5 sc, inc) x 6 [42]
Round 8-9: sc around [42]
Finish off and leave a long thread. You don’t have to stuff anything.
To attach the ears, take an ear piece and push it into a flat dome shape. Pin them to the sides of the head with a curve, and then sew them in place.


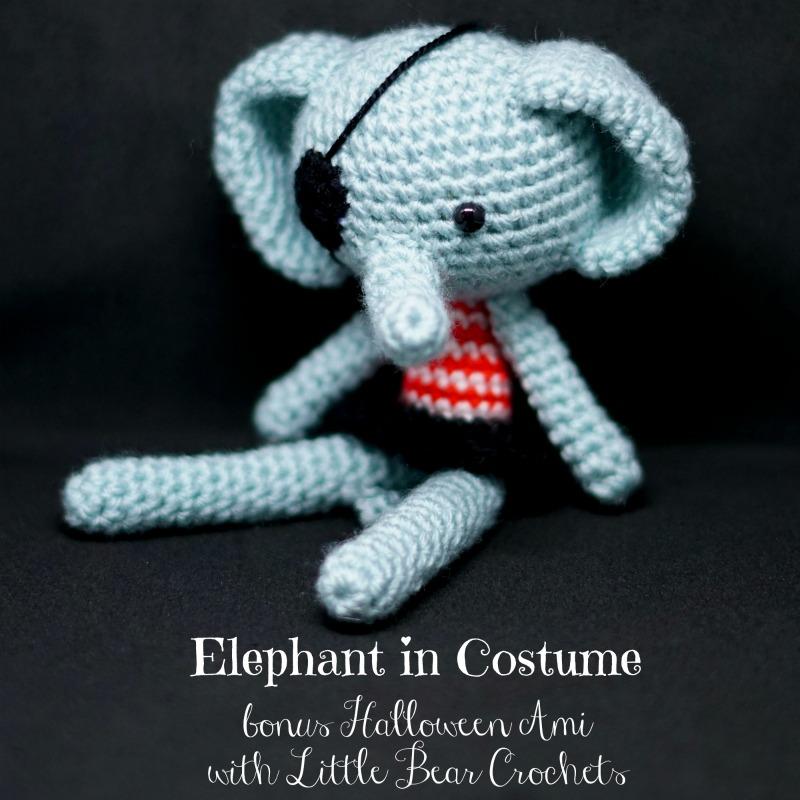
Almost done! Now, if you were making a pirate, there is still an eye piece to make. For the witch version, there is a witch hat.
Eye patch
Use black yarn
Round 1: In a m.c., make the following stitches: sc, hdc, dc, hdc, 2sc, hdc, dc, hdc, ss
Finish off and leave a long thread.
Sew the eye patch to the face at the location of the second eye. Afterwards, embroider a thread around the head from the top of the eye patch to the bottom, like on the pictures below.


Witch hat
Use black yarn
Round 1: 4 in a m.c. [ 4 ]
Round 2: (inc, sc) x 2 [ 6 ]
Round 3: (2 sc, inc) x 2 [ 8 ]
Round 4: (inc, 3 sc) x 2 [10]
Round 5: (4 sc, inc) x 2 [12]
Round 6: (5 sc, inc) x 2 [14]
Round 7: (6 sc, inc) x 2 [16]
Round 8: (7 sc, inc) x 2 [18]
Round 9: FLO (2 sc, inc) x 6 [24]
Round 10: (3 sc, inc) x 6 [30]
Finish off and work away your thread.
Simply place the hat on the elephant’s head if you want to be able to undress it too, otherwise just stuff the hat a little and sew it in place by sewing along round 8.

Now that you’re familiar with the pattern, consider shaking things up a bit! You can give the elephant’s outfit different colors to make a more neutral elephant that can join you all year round. What colors would you use if you’d prefer to make a cowboy! Do you already have plans to make an elephant nurse or doctor? You can share all your ideas and alternative decorations in the comments to encourage other CAL-crocheters. :)
That was all! I hope you enjoyed my pattern and these weeks together. Don’t forget, you can still find me on Furl’s Facebook group to answer your questions. If you want to show me your work, please do so with #littlebearcrochets on social media, or you can go to Furls’ or LittleBearCrochets’ Facebook page! I would love to see all your creations!


