

Both beautiful and functional, these would make the perfect Mother’s Day gift. This free crochet pattern includes instructions for a daffodil, a daisy, and a tulip, but if those aren’t mom’s favorite flower it should be easy to retrofit a different bloom to one of the stem bases! I can’t wait to see how our ami gardens grow!
Updated 6/1/2024

ABOUT THE DESIGNER
Brenna Eaves is the one-woman team behind Little Raven Fiber Arts. A self-taught fiber artist with more than 13 years’ experience building things with stitches, she has the type of yarn stash that, if unraveled and tied end to end, would stretch to the moon and back. Though also an accomplished knitter, cross-stitcher, writer, artist, and graphic designer, crochet is her happy place. She lives and works out of Wisconsin.
Facebook / Instagram / Tumblr / Ravelry / Twitter

SUPPLIES
- Furls Wander Worsted Weight yarn in two colors for the watering can (main color and spout color), brown, green, and flower colors (pink, yellow, white)
- 4.5mm G+ or 5.00mm H Furls Streamline Metal Crochet Hook
- Cardboard / foam core to reinforce the base
- Generic ballpoint pen
- Stuffing
- Tapestry needle

PATTERN DETAILS
Finished Dimensions
Flower pens: about 7.5” tall
Watering can: about 4” tall, 8” wide (including spout and handle), 4” wide (without spout and handle)
Stitches Used
Ch = chain, Sc = single crochet, Sc dec = single crochet decrease, Slp st = slip stitch, Hdc = half double crochet, Dc = double crochet
Other Abbreviations
Rep = repeat
BLO = back loops only
FLO = front loops only
Notes
Do not chain 1 at the beginning of rows unless otherwise instructed. When working in the round, do not join with a slip st or ch 1 at the beginning of rounds. Use a stitch marker to mark your rounds.
For best results, block the flower petals before assembly.
Add this pattern to your Ravelry Favorites
Join our CAL Group, Fun with Furls

In Part One we’ll be making our watering can pots that have a hole in the dirt to “plant” our flower pens, which we’ll learn how to make in Part Two.
PART ONE

Watering Can
With main color, ch 2 or magic loop
Rnd 1: 7 sc in 2nd ch from hook / loop (7)
Rnd 2: 2 sc in each sc around (14)
Rnd 3: *2 sc in 1st sc, sc in next sc* rep *-* around (21)
Rnd 4: *2 sc in 1st sc, sc in next 2 sc* rep *-* around (28)
Rnd 5: *2 sc in 1st sc, sc in next 3 sc* rep *-* around (35)
Rnd 6: *2 sc in 1st sc, sc in next 4 sc* rep *-* around (42)
Rnd 7: *2 sc in 1st sc, sc in next 5 sc* rep *-* around (49)
Rnd 8: *2 sc in 1st sc, sc in next 6 sc* rep *-* around (56)
Trace the circle on your cardboard or foam board, cut out, set aside.
Rnd 9: in BLO, sc dec, sc in next 26 sc, sc dec, sc in last 26 sc (54)
Rnd 10-24: sc in each sc around (54)
Trace the bottom of the pot onto some thick cardboard or foam core and then refine the tracing to be closer to a perfect circle: cut out. Place the cardboard or foam core disc into the bottom of the can. It may be necessary to shave down the edges a little before it will fit, but it’s good if it’s a snug fit.
Rnd 25: in BLO, *sc dec, sc in next 25 sc* rep *-* 2x (52)
Rnd 26: in BLO, sc in 1st 12 sc, sc dec, sc in next 24 sc, sc dec, sc in last 12 sc (50)
Rnds 27-30: in both loops, sc in each sc around (50)
CHANGE COLOR to brown
Rnd 31: in FLO, sc in each sc around (50)
Rnd 32: in both loops, *sc dec, sc in next 6 sc* rep *-* 6x, sc in last 2 sc (44)
Rnd 33: *sc dec, sc in next 5 sc* rep *-* 6x, sc in last 2 sc (38)
Rnd 34: *sc dec, sc in next 4 sc* rep *-* around (32)

Roll the interior of the can down into the can base (like the cuff of a sock) until Rnd 25 makes a flat rim. The dirt should be forming a little mound inside.

Continue working like this.

Rnd 35: *sc dec, sc in next 3 sc* rep *-* around (26)
Stuff the inside of the can with a downward-pushing motion: you want to fill out the sides and the bottom of the watering can but not up under the folded rim.
Rnd 36: *sc dec, sc in next sc* rep *-* 5x, sc in last 2 sc (17)
Rnd 37: sc dec, sc in next 4 sc, sc dc, sc in next 3 sc, sc dec, sc in last 4 sc (14)
FO
Where the central hole in the dirt is, use your finger to worm a hole down through the center of the stuffing.

Now do this:
With brown, ch 2 or magic loop
Rnd 1: 7 sc in 2nd ch from hook / loop (7)
Rnd 2: 2 sc in each sc around (14)
Rnd 3: in FLO, sc in each sc around (14) (the right side stitches are will be on the inside of the tube)
Rnds 4-10: sc in each sc around (14)
FO and work the tube into the hole in the stuffing of the watering can until the top is flush with the last round of the dirt mound. Use one of the FO ends to sew the tube into the hole.

Handle
With main color, ch 9, join with a slip stitch to form a ring (be careful not to twist the ch)
Rnd 1: sc in each ch around (8)
Rnds 2-18: sc in each sc around (8)
Rnd 19: 2 sc in 1st sc, sc in last 7 sc (9)
Rnds 20-23: sc in each sc around (9)
FO leaving a medium tail for attaching to the can base. Flatten the tube.
Sew the wide end of the handle just under the rim of the watering can, I sewed mine on so the offset where the rounds begin is centered on and sort of hidden by the handle. Weave in this end. Sew the narrower (chain edge) end of the handle to the bottom of the can, at rounds 10-11. Make sure the top and the bottom of the handle are vertically aligned with each other.
Spout
With spout color, ch 2 or magic loop
Rnd 1: 7 sc in 2nd ch from hook / loop (7)
Rnd 2: 2 sc in each sc around (14)
Rnd 3: *2 sc in 1st sc, sc in next sc* rep *-* around (21)
CHANGE COLOR to main color
Rnd 4: *2 sc in 1st sc, sc in next 2 sc* rep *-* around (28)
Rnd 5: in BLO, *sc dec, sc in next 2 sc* rep *-* around (21)
Rnd 6: sc in each sc around (21)
Rnd 7: *sc dec, sc in next 2 sc* rep *-* 4x, sc dec, sc in next sc, sc dec (15)
Rnd 8: *sc in 1st 4 sc, sc dec* rep *-* 2x, sc in last 3 sc (13)
Rnd 9: in FLO, sc in each sc around (13)
STUFF the spout end firmly
Rnd 10: now in both loops, sc dec, sc in last 11 sc (12)
Rnds 11-18: sc in each sc around (12)
Rnd 19: hdc in 1st sc, dc in next 3 sc, hdc in next sc, sc in next sc, slp st in next sc, TURN
Row 20: sk slp st, sc in next 6 sts
FO leaving remaining stitches unworked. STUFF the neck of the spout firmly and evenly. Sew it to the bottom of the can, at about rounds 10 through 13. You’ll want it to be directly across from the handle. Weave in ends.
PART TWO
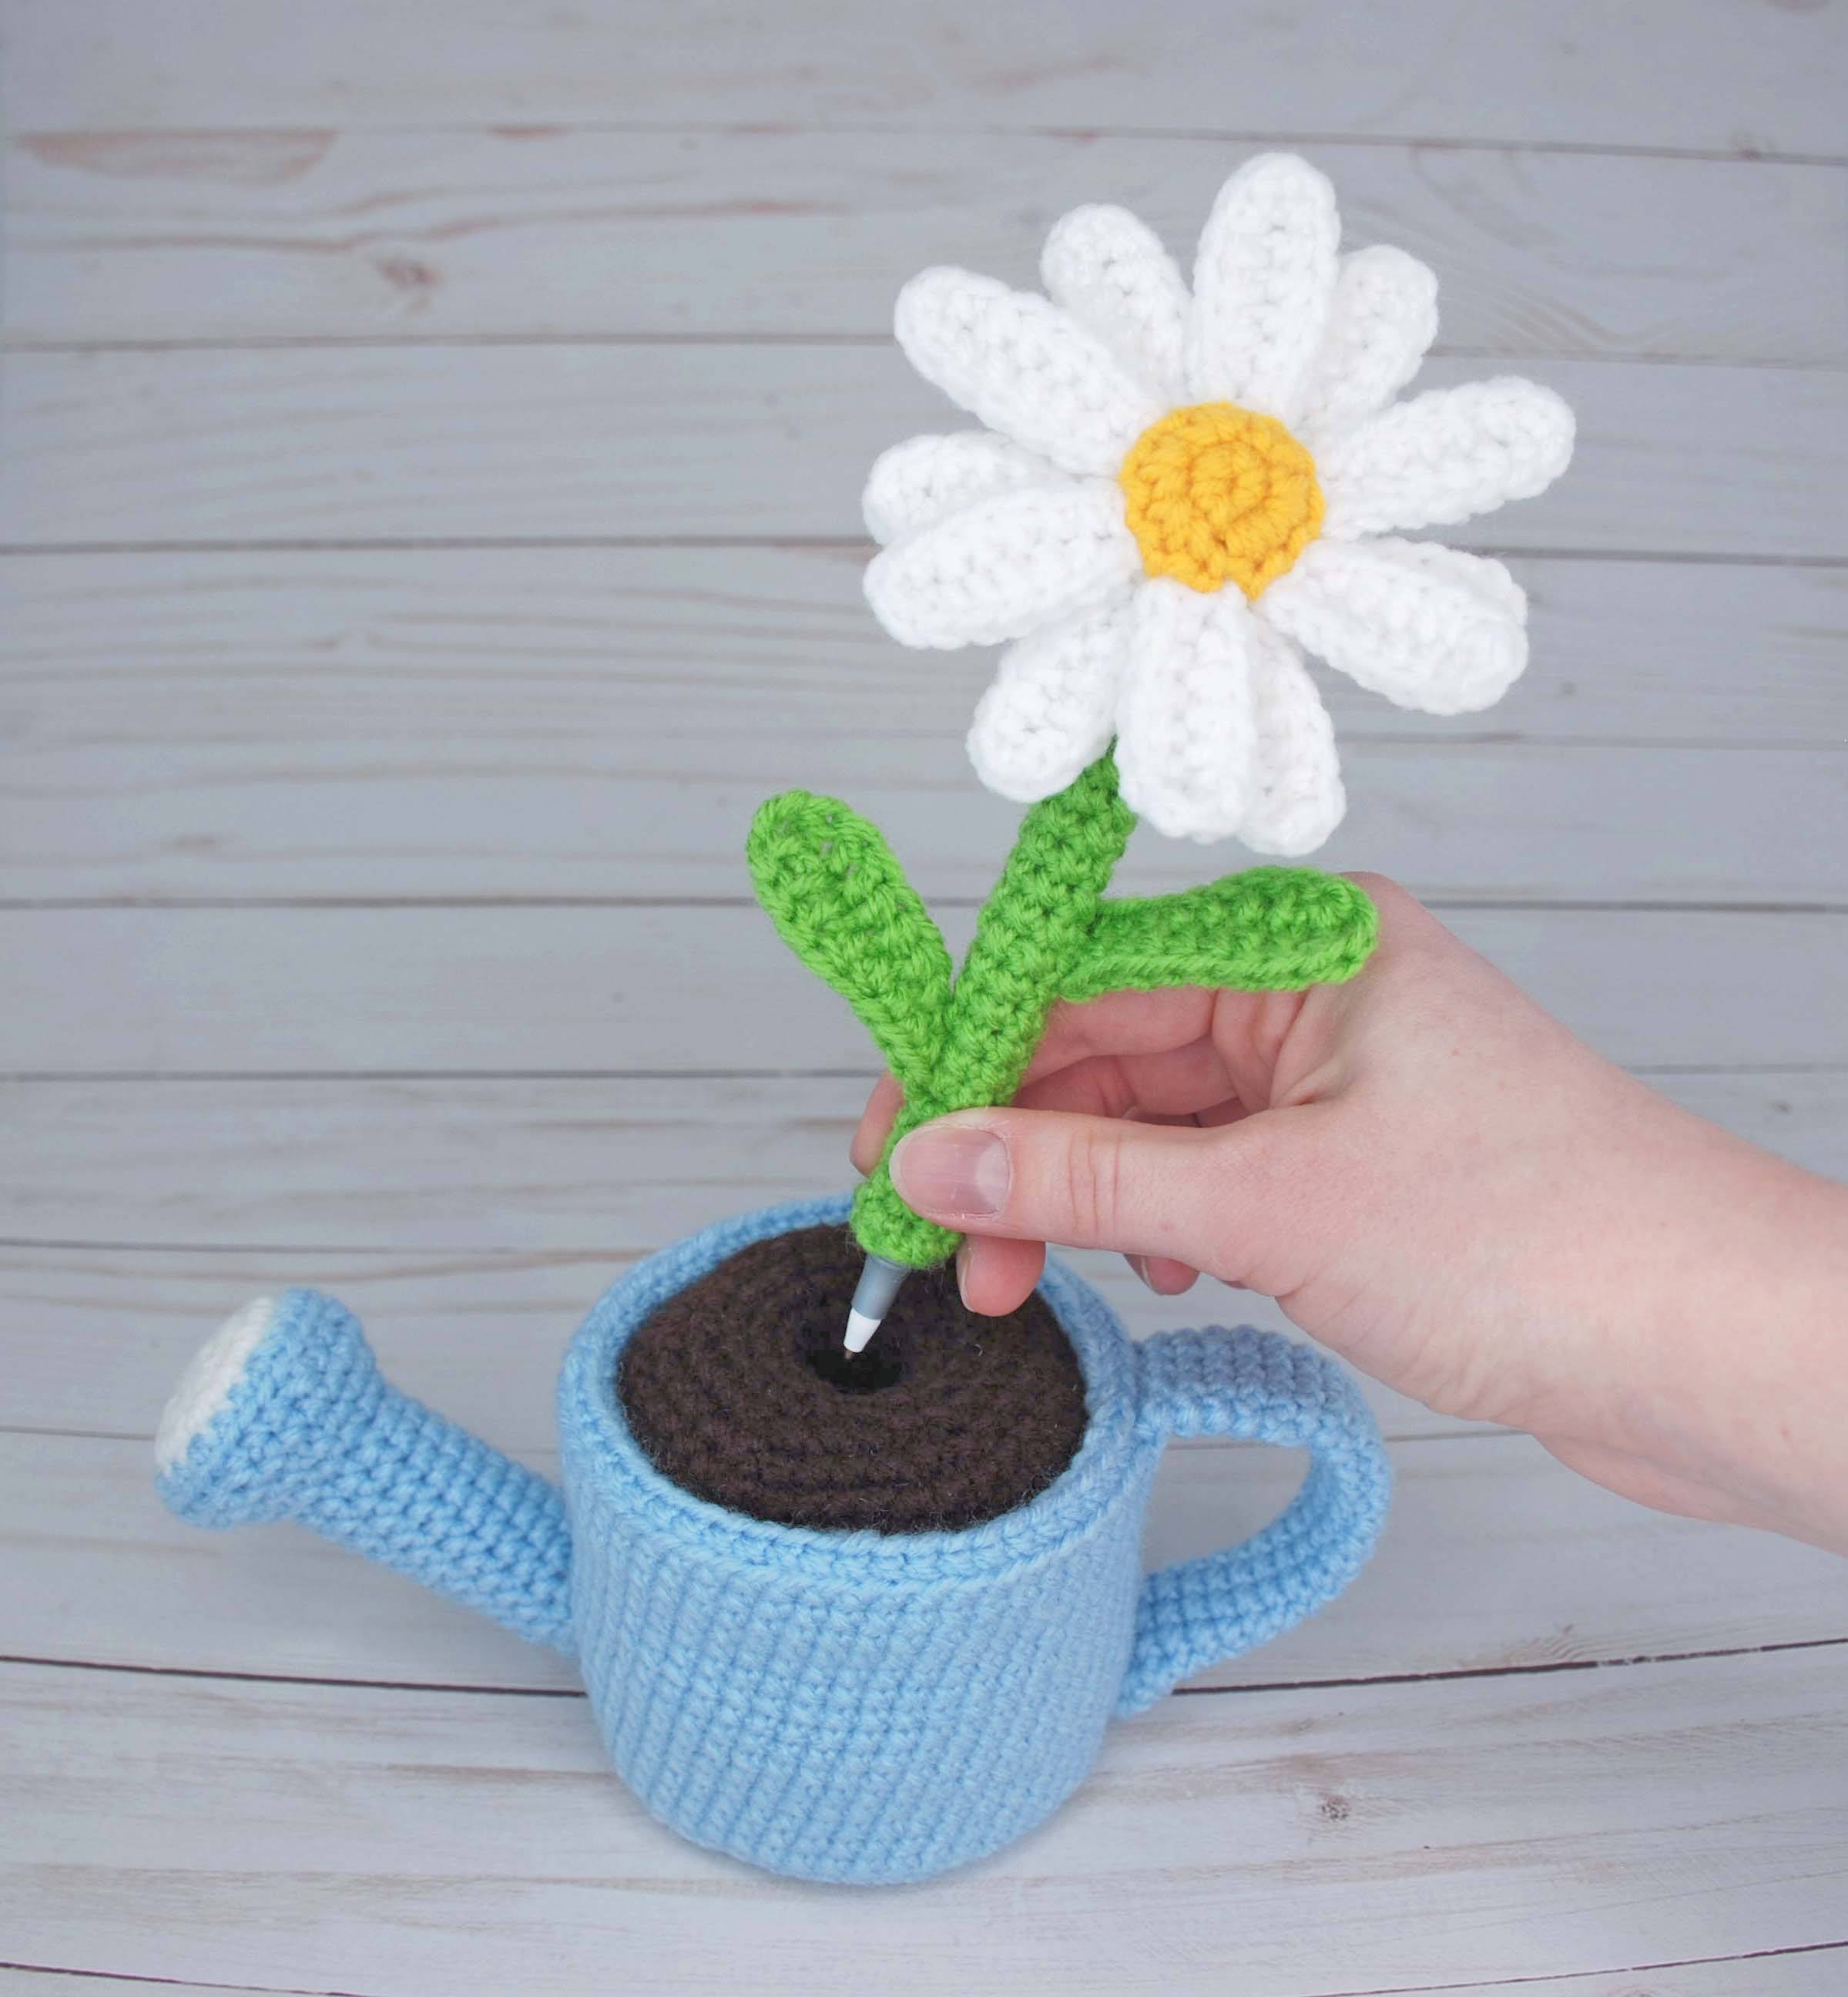
Welcome to Part Two, where we get to go flower-picking! I’ve got instructions for a daffodil, daisy, and tulip, so have your ballpoint pens handy and let’s make them bloom!
Daisy

Petals (make 12)
With white, ch 9
Rnd 1: sc in 2nd ch from hook and in next 2 ch, hdc in next 3 ch, sc in next ch, 2 sc in last ch, turn the work so you’re working along the bottom edge of the ch, sc in next ch, hdc in next 3 ch, sc in next ch, slp st in last 2 ch
FO
Arrange all the petals into two sets of six.
Note: If needed, block petals before assembly.

Using the FO tails of each petal, attach to next petal with one or two whipstitches in the 1st sc of Rnd 1.

You’ll have two six-petaled flower layers.

Pull the tail ends of the top set of six petals through the center hole of the bottom set of six petals.

Arrange the top layer of petals so they’re offset from the bottom.

Center
With yellow, ch 2 or magic loop
Rnd 1: 6 sc in 2nd ch from hook (6)
Rnd 2: 2 sc in each sc around (12)
FO
There are 12 petals, and 12 stitches around this circle.

In order to keep the petals arranged in their stacked offset, we’re going to stitch the center on by matching each sc of this circle to each petal.

It will form a stitched yellow circle around the backside of the petals: this won’t be visible once we sew the stem on. Once you’ve affixed all 12 petals to all 12 stitches of the yellow center, weave in the yellow end.

You can tie the white ends together at the back and trim them, stuffing the trimmed ends into the back of the flower center. They will end up hidden under the stem.

Stem
With green, ch 7, join with a slip stitch to form a ring (be careful not to twist chain)
Rnd 1: work 6 sc in ring (6)
Rnds 2-23: sc in each sc around (6)
Rnd 24: slp st in 1st 3 sc, dc in next sc, 2 dc in next sc, dc in last sc (7)
Rnd 25: 2 sc in each sc around (14)
FO
Sew to the underside of the daisy, covering the yellow stitches that aligned the petals, weave in the ends.
Uncap the ballpoint pen and fit the stem over it like a sleeve. It should be snug enough that you won’t need to glue the pen to keep it inside, and this way when the ink runs out, it’s easy to replace!
Leaves (make 2)
With green, ch 10
Rnd 1: sc in 2nd ch from hook and in next 2 ch, hdc in next 3 ch, dc in next 2 ch, [dc, ch 2, dc] in last ch, turn the work so you’re working along the bottom edge of the ch, dc in next 2 ch, hdc in next 2 ch, sc in last 4 ch
FO
Sew to the sides of the stem, one higher and one lower. Weave in the ends.
Daffodil

Petals (make 6)
With yellow, ch 9
Rnd 1: hdc, dc in 3rd ch from hook, 2 dc in each of the next 2 ch, dc in next ch, hdc in next ch, sc in next ch, slp st in last ch, CH 2, slp st in same ch, turn the work so you’re working along the bottom edge of the ch, hdc in next ch, dc in next ch, 2 dc in each of the next 2 ch, slp st to join to the 2 ch
FO
Arrange the petals into two groups of three. Use the FO ends to tack one set of three petals together, repeat with the second set of three petals (see how the daisy is assembled above: the idea is the same).
Layer both sets of three on top of each other, offset, and tack them together with a few whipstitches. Knot the ends off at the back, you can trim these down, they will be concealed under the stem.
Corona (center cup)
With yellow, ch 2 or magic loop
Rnd 1: 6 sc in 2nd ch from hook / loop (6)
Rnd 2: 2 sc in each sc around (12)
Rnds 3-5: sc in each sc around (12)
Rnd 6: *2 sc in 1st sc, sc in next sc* rep *-* around (18)
Rnd 7: *ch 1, slp st in next sc* rep *-* around
FO and weave in this end. Use the beginning tail to stitch the corona to conceal the open center of the petals. Weave in the end.
Stem
With green, ch 7 and join with a slip st to form a ring (be careful not to twist chain)
Rnd 1: sc in each ch around (6)
Rnds 2-25: sc in each sc around (6)
Rnds 26-27: slp st in 1st 3 sts, dc in last 3 sts (6)
Rnd 28: 2 sc in each st around (12)
FO
Sew this end of the stem onto the back of the daffodil, concealing the tied-off ends from the petals and the open center.
Uncap the ballpoint pen and fit the stem over it like a sleeve. It should be snug enough that you won’t need to glue the pen to keep it inside, and this way when the ink runs out, it’s easy to replace!
Leaf
With green, ch 19
Row 1: sc in 2nd ch from hook and in each of the next 13 ch, slp st in last 4 ch, ch 2 and turn the work so you’re working along the bottom edge of the ch, slp st in next 6 ch, sc in remaining ch
FO
Sew the bottom of the leaf to the stem of the daffodil, weave in all remaining ends.
Tulip

Inner Flower
With pink, ch 2 or magic loop
Rnd 1: 6 sc in 2nd ch from hook / loop (6)
Rnd 2: 2 sc in each sc around (12)
Rnd 3: *2 sc in 1st sc, sc in next sc* rep *-* around (18)
Rnd 4: *2 sc in 1st sc, sc in next 2 sc* rep *-* around (24)
Rnds 5-7: sc in each sc around (24)
Rnd 8: *sc dec, sc in next 2 sc* rep *-* around (18)
Rnds 9-10: sc in each sc around (18)
STUFF the inner flower firmly
Rnd 11: *sc dec, sc in next sc* rep *-* around
Rnd 12: *sc dec, sc in next sc* rep *-* around
STUFF the flower more if necessary
Rnd 13: sc dec
FO and weave in the ends.
Outer petals (make 2)
With pink, ch 4
Rnd 1: sc in 2nd ch from hook and in next ch, 6 dc in last ch, turn the work so you’re working along the bottom edge of the ch, sc in next ch, sc in same ch as 1st sc (10)
Rnd 2: 2 sc in 1st sc, sc in next 2 sc, 2 dc in each of the next 5 sts, sc in last 2 sc (16)
Rnd 3: (sc, ch 1, sc) in 1st sc, sc in next 3 sc, 2 dc in next 9 sts, sc in last 3 sts (26)
Rnd 4: sc in 1st sc, (sc, ch 1, sc) in ch 1 sp, sc in next sc, slp st
FO leaving remaining sts unworked. Sew the bottom half of the teardrop shape to either side of the inner flower. The bottom of each outer petal should touch/overlap round 1 of the inner flower. Weave in ends.
Stem
Ch 7, join with a slip stitch to form a ring (be careful not to twist chain)
Rnd 1: work 6 sc in ring (6)
Rnds 2-23: sc in each sc around (6)
Rnd 24: 2 sc in each sc around (12)
FO, weave in the first end.
Use the FO end to sew the stem to the bottom of the tulip flower. Weave in end.
Uncap the ballpoint pen and fit the stem over it like a sleeve. It should be snug enough that you won’t need to glue the pen to keep it inside, and this way when the ink runs out, it’s easy to replace!
Leaves
Ch 20
Rnd 1: dc in 3rd ch from hook, dc in next 13 ch, hdc in next 2 ch, sc in next ch, slp st in last ch, ch 1, turn the work so you’re working along the bottom edge of the ch, slp st in same ch, sc in next ch, hdc in next 2 ch, dc in last 14 ch
FO and sew the bottom of the leaves to each side of the stem, right where it would meet the dirt (if you sew it to the very bottom of the pen, it makes the stem too wide to fit). Weave in ends.

Thanks for joining us for this CAL! Share your pics and progress with us on Ravelry, Facebook, and Instagram (tag @littleravenfiberarts and @furlscrochet so we don't miss it!), we're excited to see your blooms!
FIND MORE FREE AMIGURUMI PATTERNS:


