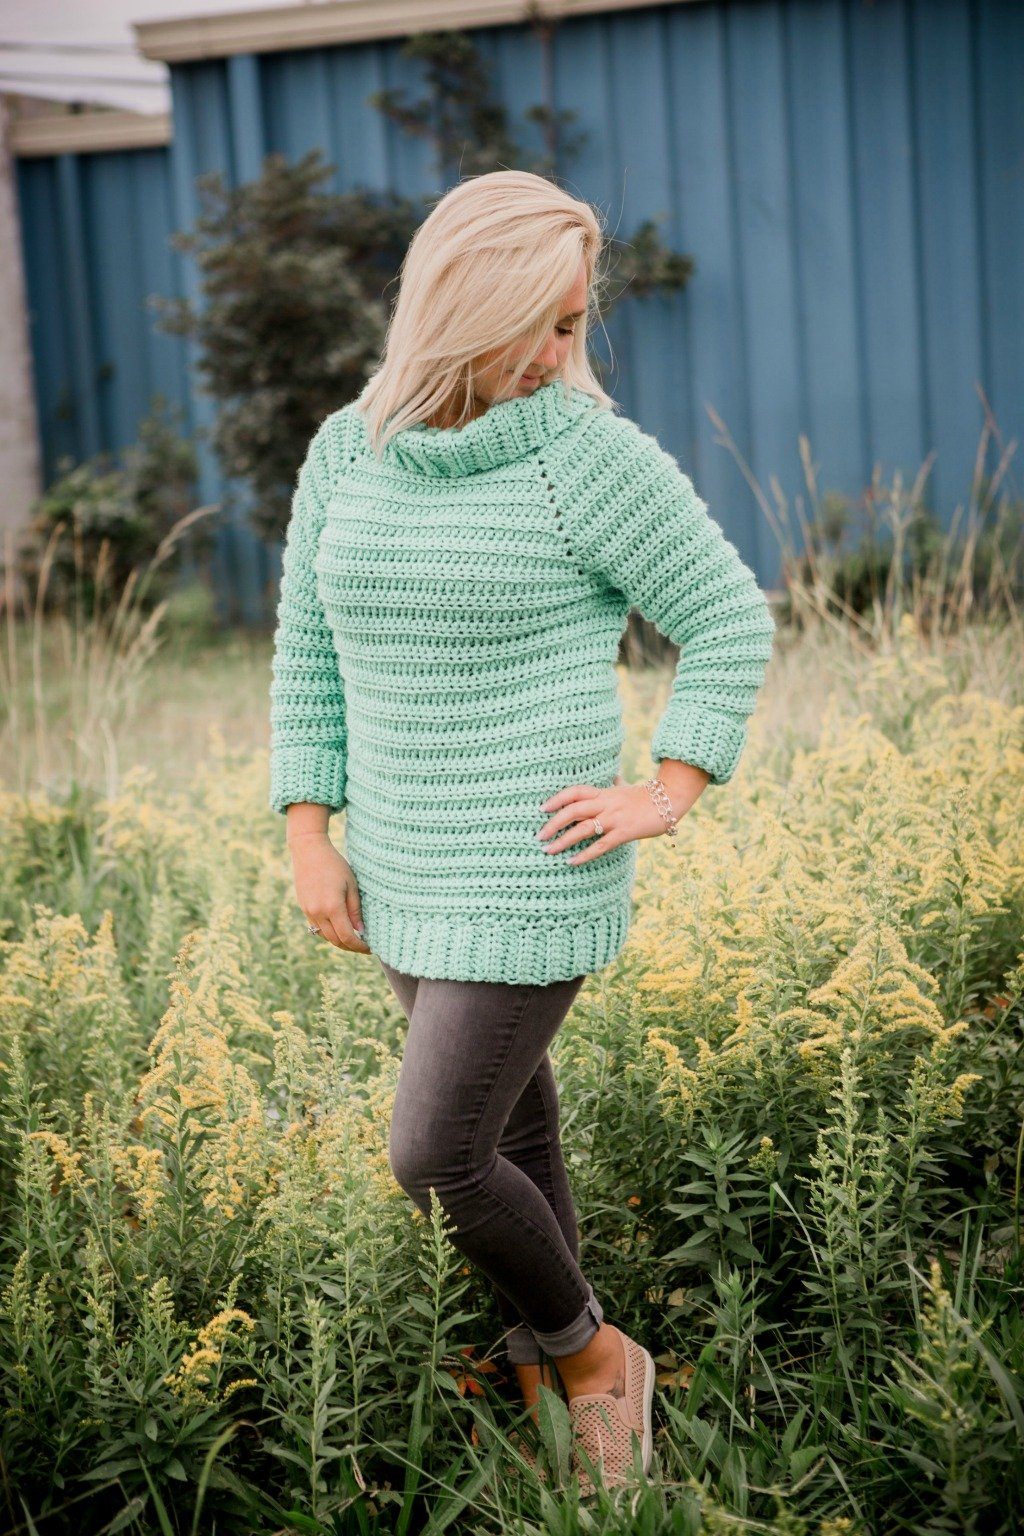
Boyfriend Sweater with optional cowl neck
This super comfy pullover is perfect for those Rainy Days Ahead. This fun design can be customized in many different ways. I have chosen to make my sweater with a full cowl neck that is left open in the back. You can choose to close the cowl neck or to leave the sweater with an open neckline.
You can also play with the length of this free crochet cowl neck sweater and the length of the sleeves, as well as the ribbing along the edges. This sweater would also make an awesome sweater dress.
The Rainy Days Ahead Sweater was originally designed as part of my yearly subscription, A Year in Crochet 2018. You can read all about the exclusive membership HERE. If this is something that interests you, you can get FREE access to the entire years' patterns from 2018, 50% off next years membership in A Year in Crochet AND 50% off every pattern I've ever designed by joining my Loyalty Program at the Cashmere Level. PS you'll get an exclusive specially designed Furls hook when you join A Year in Crochet 2019.

So let's get started with the Rainy Days Ahead free crochet cowl neck sweater. Below you will find the supply list, pattern details including a sizing schematic and part one of the pattern. Feel free to comment in our sister group on Facebook, Fun with Furls, or by email at lorene.e@furlscrochet.com. We'd also love to see your progress photos, you can share them on our Ravelry listing HERE.
This post contains affiliate links. You can click on any yarn or material highlighted to purchase.
SUPPLIES
YARN
7 (8, 9, 10, 12, 13, 14, 16) skeins Brava Bulky Yarn from Knit Picks- 100% premium acrylic yarn
Sample uses Tranquil
OR 960 (1080, 1220, 1360, 1520, 1700, 1900, 2120) yards of comparable bulky weight yarn
MATERIALS
7.0mm hook – I used my Lemon Candy Shop from Furls Crochet
PATTERN DETAILS
DIFFICULTY
Easy to intermediate
FINISHED SIZE or SIZE(S)
follows CYC Standard Sizes- for more information click here
FINISHED MEASUREMENTS
see schematic

GAUGE
13 sts and 8 rows = 5”- in hdc blo
begin swatch with fhdc for continuity
STITCH GUIDE
ch(s) – chain(s), sc – single crochet, hdc – half double crochet, dc – double crochet, st(s) – stitch(es), BLO – back loop only, RS – right side, WS – wrong side, sl st – slip stitch, rnd(s) – round(s)
NOTES
- Pattern is written starting in size Small with the rest of the sizes shown in paranteheis- S (M, L, 1x, 2x, 3x, 4x, 5x)
- Ch 2 is not considered the first hdc, the first hdc will be placed in the first/same st as the beginning ch-2.
- Be sure to work your fhdc row with minimal tension, to ensure fit over the head.
- This design is constructed top down/raglan style. The sleeves and cowl neck are then added to the body of the sweater.
- You can seam your sweater any way you like, I prefer a mattress seam.
- To customize for length, you will simply subtract or add rows to the body section repeats in multiples of two. Every two rows equals approx. 1.25”.
- To make your trim/ribbing sections thinner or wider (including the optional cowl neck, simply subtract or add more sts to the first row of ribbing. Every 3 sts adds approx. 1”
- This pattern is designed to be oversized. It includes 4” of ease, and plenty of room under the arms. If you prefer a more fitted sweater you can go down one size. This sweater is made using a #5 weight yarn that is on the thinner side for #5 yarns. You can comfortabley use a thicker #4 weight yarn as well. The most important thing is to check your gauge (adjusting your hook size as needed). If you can get gauge, you can use whatever yarn you prefer. The size is also less indicitive of fit than the measurements are. Please check the schematic to determine what size you should make.

PART ONE
In part one we are working on the yoke of the sweater. This pattern is worked from the top town. We will finish by separating the body and the sleeves of the pattern and work the rest of the body section. Next week we will add the bottom ribbing and our sleeves.
Rnd 1: Fhdc 48 (52, 52, 52, 56, 56, 56, 56), sl st into the top of the first fhdc (skipping over the unused ch-2 at the beginning) to join into a circle– the open space left at the join will be seamed closed and stitched over during finishing. Ch 2, turn – 48 (52, 52, 52, 56, 56, 56, 56) sts
Rnd 2: hdc blo in the first st, hdc blo in the next 7 (8, 8, 8, 9, 9, 9, 9) sts, [2 hdc, ch 2, 2 hdc] in both loops of the next st (first raglan corner made), * hdc blo in the next 6 sts, [2 hdc, ch 2, 2 hdc] in both loops of the next st (raglan corner made)**, hdc blo in the next 16 (18, 18, 18, 20, 20, 20, 20) sts, [2 hdc, ch 2, 2 hdc] in both loops of the next st, repeat from * to ** one time, hdc blo of the next 8 (9, 9, 9, 10, 10, 10, 10) sts, sl st into the first hdc, skipping over the beg ch-2, to join. Ch 2, turn – 60 (64, 64, 64, 68, 68, 68, 68, 68) sts and 4 ch-2 sps
Next 0 (1, 2, 3, 4, 5, 6, 7) Rnds: hdc blo in first st, *hdc blo in each st to ch-2, [2 hdc, ch 2, 2 hdc] in the ch-2, repeat from * three times more, hdc blo in each st to end, sl st into the first hdc, skipping over the beg ch-2, to join. Ch 2, turn – 60 (80, 96, 112, 132, 148, 164, 180) sts and 4 ch-2 sps
Next 13 Rnds: hdc blo in first st, *hdc blo in each st to ch-2, [hdc, ch 2, hdc] in the ch-2, repeat from * three times more, hdc blo in each st to end, sl st into the first hdc, skipping over the beg ch-2, to join. Ch 2, turn – 164 (184, 200, 216, 236, 252, 268, 284) sts and 4 ch-2 sps
SEPARATING for BODY and SLEEVES
Next Row: *hdc in each st to ch-2 sp, hdc in the ch-2 sp, working off the base of the last hdc, fhdc 1 (1, 1, 1, 3, 3, 3, 3) times, begin an additional fhdc as follows; working into the ch of the previous fhdc, YO and pull up loop (3 loops on hook), insert hook into the next ch-2 sp (skipping the unworked sts in between) yarn over and pull through the ch-2 sp (four loops on hook), YO and pull through all four loops on hook; repeat from * one time, hdc in each st to end, sl st into the first hdc, skipping over the beg ch-2, to join. Ch 2, turn Mark the 4 sts placed in the ch-2 sps. The unworked sts will become the sleeves.
– 99 (111, 121, 129, 141, 149, 157, 165) sts
Next 24 (23, 24, 23, 24, 23, 24, 23) Rows: hdc in each st to end, sl st into the first hdc, skipping over the beg ch-2, to join. Ch 2, turn – 99 (111, 121, 129, 141, 149, 157, 165) sts
Do NOT fasten off- do not turn on the last repeat- this last row will be referred to as the base row for the edging portion below
PART TWO
Now we will be adding the bottom ribbing to the sweater and adding the sleeves. Next week we will add the ribbing to the sleeves, create the optional cowl neck and add all of the finishing touches.
BOTTOM RIBBING
Beginning in the last st you worked on the base row
Row 1: Fhdc 7. Ch 2, turn – 7 sts
Row 2: hdc blo in each st, working along the base row, insert your hook into the first unworked st, yarn over and pull through the st (two loops on hook), insert the hook in next unworked st, yarn over and pull through the st (three loops on hook), insert hook in next unworked st, yarn over and draw through the stitch AND all the remaining loops on the hook. Ch 1, turn – 7 sts
Row 3: skip the ch-1, hdc blo in each st. Ch 2, turn – 7 sts
Repeat rows 2-3 consecutively: until all the unworked sts along the base row are worked (you may have to add or omit a portion of the slip st along the base row on the last repeat). Fasten off, leaving a long tail for seaming (approx. 18” will suffice). With garment wrong side out, seam the two edges of the edging together- Fasten off
SLEEVES
In the yoke section sizes S, L, 2x and 4x ended with a wrong side row facing out for the sleeves. Sizes M, 1x, 3x and 5x ended with a right side row facing out- for these sizes, turn the work right side in, so that the wrong side of the row is facing out. Be sure to begin working into the wrong side of the row for your sleeves.
Rnd 1: Join yarn with a sl st in the center underarm st (this will be the 1st (1st, 2nd, 2nd, 2nd, 3rd, 3rd, 3rd fdc you made), ch 2 and hdc blo in the same st, hdc blo in the next 0 (0, 1, 1, 1, 2, 2, 2) sts, hdc2tog, in both loops; over the marked st and the next st, hdc blo in each st around until one st before the next marked st, hdc2tog, in both loops; over the next st and the marked st, sl st in the first hdc, skipping over the beg ch-2, to join. Ch 2, turn – 37 (41, 45, 49, 55, 59, 63, 67) sts
Next 3 (4, 5, 6, 7, 8, 9, 10) Rows: hdc blo in the first st, hdc2tog blo, hdc blo in each st around, sl st in the first hdc, skipping over the beg ch-2, to join. Ch 2, turn – Each row will decrease by 1, total sts at the end of all rows – 34 (37, 40, 43, 48, 51, 54, 57)
Next Row: hdc blo in each st around, sl st in the first hdc, skipping over the beg ch-2, to join. Ch 2, turn – 34 (37, 40, 43, 48, 51, 54, 57)
Next Row: hdc blo in the first st, hdc2tog blo, hdc blo in each st around, sl st in the first hdc, skipping over the beg ch-2, to join. Ch 2, turn – 33 (36, 39, 42, 47, 50, 53, 56)
Repeat last 2 rows consecutively: 6 times – 27 (30, 33, 36, 41, 44, 47, 50)
Next 2 Rows: hdc blo in the first st, hdc2tog blo, hdc in each st around until 2 sts remain, hdc2tog blo, sl st in the first hdc, skipping over the beg ch-2, to join. Ch 2, turn – 23 (26, 29, 32, 37, 40, 43, 46)
Next Row: hdc blo in each st around, sl st in the first hdc, skipping over the beg ch-2, to join. Ch 2, do NOT turn– 23 (26, 29, 32, 37, 40, 43, 46) Do NOT fasten off- this last row will be referred to as the base row for the edging portion below
PART THREE
This week we are finishing our sweaters, YAY. We'll be adding the sleeve ribbing, working on the (optional) cowl neck and adding the finishing details.
I can't wait to see your finished sweaters, please share them in our sister CAL group on FB, Fun with Furls, on our Ravelry page, or on Instagram - use #furlscrochet and #rainydaysahead
SLEEVE RIBBING
Row 1: Fhdc 7. Ch 2, turn – 7 sts
Row 2: hdc blo in each st, working along the base row, insert your hook into the first unworked st, yarn over and pull through the st (two loops on hook), insert the hook in next unworked st, yarn over and pull through the st (three loops on hook), insert hook in next unworked st, yarn over and draw through the stitch AND all the remaining loops on the hook. Ch 1, turn – 7 sts
Row 3: skip the ch-1, hdc blo in each st. Ch 2, turn – 7 sts
Repeat rows 2-3 consecutively: until all the unworked sts along the base row are worked (you may have to add or omit a portion of the slip st along the base row on the last repeat). Fasten off, leaving a long tail for seaming (approx. 18” will suffice). With garment wrong side out, seam the two edges of the edging together- Fasten off
Optional COWL NECK- With RS facing out; join yarn by sl st in the neckline, corresponding with the back-center seam, this row will be referred to as the base row for the neck ribbing section; If you choose to not do a cowl neck, simply sc evenly around the neckline to finish.
Row1: Fhdc 14, ch 2, turn – 14 sts
Row 2: hdc blo in each st, working along the base row, insert your hook into the first unworked st, yarn over and pull through the st (two loops on hook), insert the hook in next unworked st, yarn over and pull through the st (three loops on hook), insert hook in next unworked st, yarn over and draw through the stitch AND all the remaining loops on the hook. Ch 1, turn – 14 sts
Row 3: skip the ch-1, hdc blo in each st, ch 2, turn – 14 sts
Repeat rows 2-3 consecutively: until all the unworked sts along the base row are worked (you may have to add or omit a portion of the slip st along the base row on the last repeat) . Fasten off, leaving a long tail for (*optional) seaming (approx. 24” will suffice). With garment wrong side out, seam the two edges of the edging together- Fasten off
* You can choose to seam the ribbing of the neck or you can leave it open. You can also add buttons so that you can wear it both ways.
FINISHING
Weave in all ends- add buttons to the (optional) cowl neck if you’d like.
ABOUT OUR DESIGNER
Subscribe to the Cre8tion Crochet Weekly Newsletter for weekly free patterns, discounts on paid patterns, reviews and giveaways and business tips. You’ll be sent a promo code for one free pattern from my Ravelry shop when you sign up.