

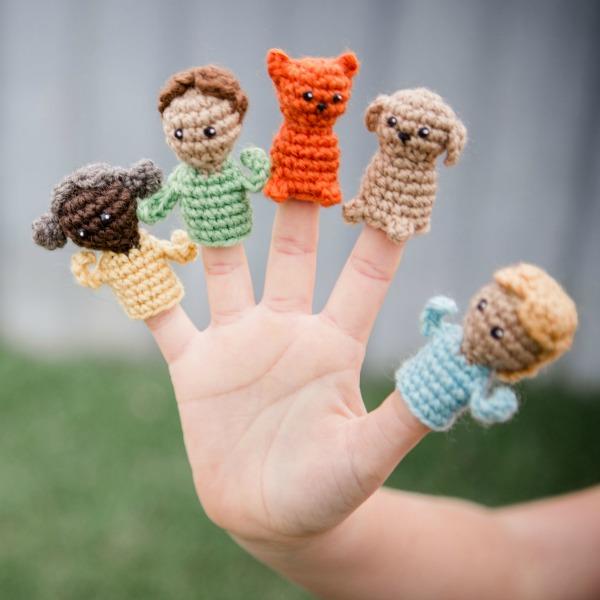
This free crochet finger puppets pattern is sure to make any little one in your life SUPER happy. These finger puppets would make an awesome holiday gift. They can be customized in so many different ways, and the pattern even includes a couple of pets. This pattern was designed by Brenna Eaves of Little Raven Fiber Arts, especially for Furls Crochet.
Updated 9/17/2024
We'd love to see your finished projects. Feel free to share on Ravelry or in the Fun with Furls grooup on Facebook.

SUPPLIES
- Worsted weight yarn - we recommend Furls Wander Acrylic. Puppets were made in Knit Picks Wool of the Andes Worsted
- 3.75mm/F Silver Streamline Metal hook
- Black fabric paint (or a colored fabric paint, this is for the eyes)
- Stuffing
- Yarn needle
- Wooden chopstick (optional, to help with stuffing)

PATTERN
Puppet Head and Body
Ch 2 or magic loop
Rnd 1: 8 sc in 2nd ch from hook / loop (8)
Rnd 2: 2 sc in each sc around (16)
Rnds 3-5: Sc in each sc around (16)
Rnd 6: Sc dec in each sc around (8)
Rnd 7: Sc in 1st 2 sc, sc dec, sc in last 4 sc (7)
CHANGE COLOR to SHIRT
Rnd 8: 2 sc in each of the first 2 sc, CHANGE to skin color and sc in each of the next 2 sc, CHANGE back to shirt color and 2 sc in each of the next 2 sc, sc in last sc (11)
Rnd 9: Sc in 1st sc, 2 sc in next sc, *ch 6, sc in 2nd ch from hook and in next 5 sc, arm made*, sc in next 6 sc, rep * - *, 2 sc in next sc, sc in last 2 sc (13)
Rnds 10-14: Sc in each sc around (13)
If you need the puppet body to be a little bit tighter or looser, while working round 10 you can place a decrease or an increase as the last stitch of the round.
FO and weave in the ends.
Using a wooden chopstick, poke a ball of stuffing into the head and only the head.
With fabric paint, daub eyes onto round 4 of the head. The front of the puppet body is where the two sc of the skin color were placed after switching to the shirt color, to create a neck of the shirt.

Hair (short) [this is the hair base]
Ch 2 or magic loop
Rnd 1: 8 sc in 2nd ch from hook / loop (8)
Rnd 2: [2 sc in next sc] 7 times, TURN your work leaving the last stitch unworked (14)
Rnd 3: Sc dec, sc in next 12 sc, slp st in next sc, TURN (14)
Rnd 4: Skip slp st, sc in next 10 sc, slp st in next sc, TURN (11)
Rnd 5: Skip slp st, sc in next 7 sc, slp st in next sc, TURN (8)
Rnd 6: Skip slp st, sc in next 5 sc, slp st in next sc (6)
FO leaving a long tail to stitch the hair to the top of the puppet head. I left the “bangs” area unstitched (the sc dec and the next sc from row 3 makes the bangs) to give it more dimension on the head.

Hair (long)
Work the hair base up to row 5.
Rnd 6: Skip slp st, sc in each sc across, TURN (7)
Rnds 7-8: Sc in each sc across, TURN (7)
Rnd 9: 2 sc in 1st sc, sc in next 5 sc, 2 sc in last sc (9)
FO and weave the end up through the side of the hair to where the base of an ear would be. Stitch the hair onto the head. I only attached the areas that would be around the ears, I didn’t tack down the length of the hair at the back or the bangs area at the front. Weave in the ends.
Hair (natural poms/side buns)
Work the hair base as written: attach to the head.
Poms (make 2)
Ch 2 or magic loop
Rnd 1: 8 sc in 2nd ch from hook / loop (8)
Rnd 2: Sc in each sc around (8)
Rnd 3: Sc dec around (4)
FO and use a wooden chopstick to stuff the beginning tail inside the tiny pom. Sew each pom to the sides of the head, on the hair base, and weave in the ends.
Cat
Ch 2 or magic loop
Rnd 1: 3 sc in 2nd ch from hook / loop, *ch 3, slp st in 2nd ch from hook, sc in last ch, ch 1, slp st in same ch as last sc (ear made)*, 3 more sc in original ch / loop, rep *-*, 1 more sc in original ch (7)
When you come back around to the ears, hold them to the front of your work and sc behind them, do not work into any of the stitches of the ears.
Rnd 2: 2 sc in each sc around (14)
Rnd 3: Sc in 1st 5 sc, *start a sc dec in the next sc and complete it through the ch 1 of the ear to secure it to the head*, sc in next 5 sc, rep *-*, sc in last 2 sc (14)
Rnds 4-5: Sc in each sc around (14)
Rnd 6: Sc dec around (7)
Rnd 7: 2 sc in 1st sc, sc in next sc, 2 sc in last 5 sc (13)
Rnds 8-10: Sc in each sc around (13)
Rnd 11: sc in 1st 6 sc, *ch 2, 2 sc in 2nd ch from hook (paw made)*, sc in next sc, rep *-*, sc in last 6 sc (13)
Rnd 12: ch 9, sc in 2nd ch from hook and in last 7 ch (tail made), sc in each sc around (13)
FO and weave in ends.
Using a wooden chopstick, poke a ball of stuffing into the head and just the head.
With fabric paint, daub eyes onto round 4 of the cat head, and a little triangle nose between and beneath the eyes. With the end of a needle you can manipulate the wet paint into a cat-eye shape, if preferred. Allow to dry.

Dog
Ch 2 or magic loop
Rnd 1: 7 sc in 2nd ch from hook / loop (7)
Rnd 2: 2 sc in each of the first 2 sc, *ch 4, slp st in 2nd ch from hook, sc in next ch, dc in last ch (ear made)*, 2 sc in each of the next 3 sc, sc in next sc, rep *-*, sc in same sc (to complete the increase), 2 sc in last sc (14)
When you come back around to the ears, hold them to the front of your work and sc behind them, do not work into any of the stitches of the ears.
Rnds 3-5: Sc in each sc around (14)
Rnd 6: Sc dec around (7)
Rnd 7: 2 sc in 1st 3 sc, sc in next sc, 2 sc in last 3 sc (13)
Rnds 8-10: Sc in each sc around (13)
Rnd 11: Sc in 1st 2 sc, ch 3, slp st in 2nd ch from hook, sc in last ch (tail made), sc in next 5 sc, *ch 2, 2 sc in 2nd ch from hook (paw made)*, sc in next 3 sc, rep *-*, sc in last 3 sc (13)
Rnd 12: Sc in each sc around (13)
FO and weave in ends.
Using a wooden chopstick, poke a ball of stuffing into the head and just the head.
With fabric paint, daub eyes onto round 4 of the dog head, and a little button-mushroom nose between and beneath the eyes. Allow to dry.


