

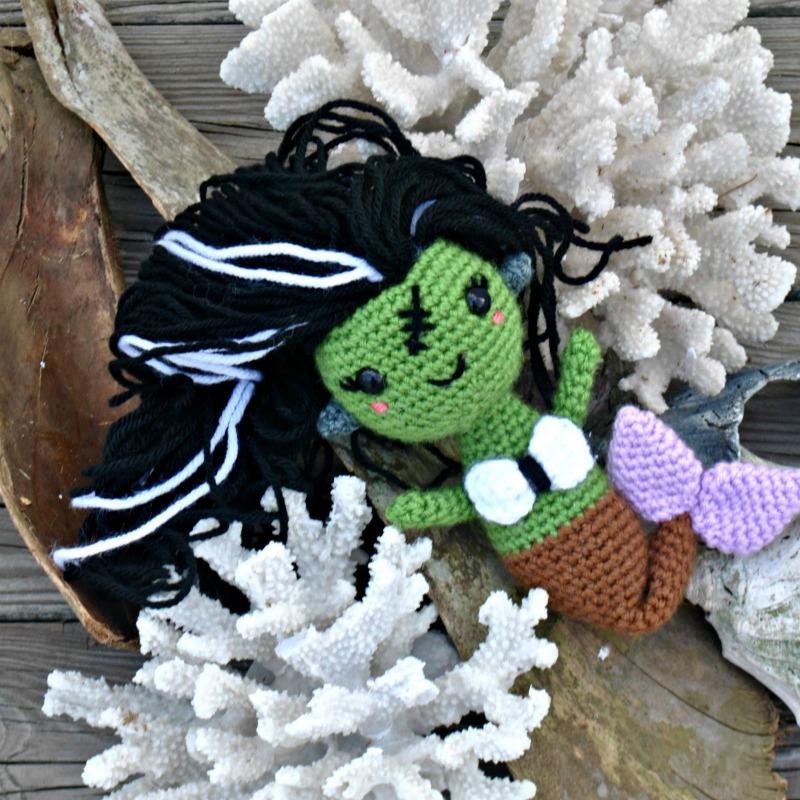
Frankie the Mermaid
Hi Furlers! It’s Vincent from Knot Bad! I can tell you now, it’s odd trying to create a doll that’s meant for October, the spooky month, when it’s still summertime and it’s 90 degrees outside. I tried to think, “Okay, Halloween has been done before, how do I throw a Knot Bad twist on it?” And the summer heat finally served a creative purpose; why not turn a classic mean Frankenstein’s Monster into a majestic, gentle mermaid! Frankenstein might only make a seasonal appearance, but mermaids are loved all year round, especially in the fiber scene! You can’t tell me you haven’t seen mermaid tails around, have you? (i.e search Pinterest, they are loved by so many).

This week, I’m just introducing you and giving you a rundown of all the materials we will be needing to make this project. Down below you will see the materials lists, all the yarn I used.

SUPPLIES
The yarn I used- All Lion Brand, but any color for worsted weight yarn will do!If you decide to substitute with Furls Wander yarn, try the following colors:
- 12mm safety eyes (2 of them)
- Darning needle
- Fiber fill
- Scissors
- Pins
- 4mm Furls Odyssey Hook
- And a spooky attitude with candy on the side!


PART ONE
Welcome to Part One of the Frankie the Mermaid CAL! Today we will be making the full body of the mermaid (head, neck, and body) and as you work it together, you realize that it’s all actually made in one piece! It’ll be important to be aware of when you will be working in the Front Loop Only.
Notes:
This entire piece will be worked in continuous rounds, so it will be helpful to have a stitch marker so you don’t lose your place. It’ll be important to be aware of when you will be working in the Front Loop Only. Be sure to stuff firmly where indicated and where you see fit!
Abbreviations:
Sc- single crochet
Inc- Increase (2 sc in same stitch)
Dec- Decrease
FLO- Front Loop Only
*- repeat around the row
( )- number of stitches at the end of the round
Beginning with the head
Begin with Green - or Meadow if using Wander:
Rnd 1: Sc 6 into Magic Ring (6)
Rnd 2: *Inc* around (12)
Rnd 3: *Sc, Inc* around (18)
Rnd 4: *Sc 2, Inc* around (24)
Rnd 5: *Sc 3, Inc* around (30)
Rnd 6: *Sc 4, Inc* around (36)
Rnd 7: *Sc 5, Inc* around (42)
Rnd 8-14: Sc around (42)
Rnd 15: *Sc 5, Dec* around (36)
Rnd 16: *Sc 4, Dec* around (30)
Insert eyes into row 12, with 8 stitches apart.

Rnd 17: *Sc 3, Dec* around (24)
Begin stuffing firmly
Rnd 18: *Sc 2, Dec* around (18)
Rnd 19: *Sc, Dec* around (12)
Rnd 20: Sc into FLO around (12)

Rnd 21-22: Sc around (12)
Rnd 23: *Sc 2, Inc* around (16)
Rnd 24: Sc around (16)
Rnd 25: *Sc 3, Inc* (20)
Rnd 26: Sc around (20)
Rnd 27: *Sc 4, Inc* around (24)
Rnd 28-31: Sc around (24)
Switch to Brown - or Cocoa if using Wander
Rnd 32-37: Sc around (24)
Rnd 38: *Sc 4, Dec* around (20)
Rnd 39: Sc around (20)
Rnd 40: *Sc 3, Dec* (16) Begin Stuffing
Rnd 41-46: Sc around (16)
Rnd 47: *Sc 2, Dec* (12)
Rnd 48-49: Sc around (12)
Finish off and close hole.

Meet us back here next week to make the fins, arms, and top, as well as attaching the hair!
PART TWO
Welcome to part 3 of the Frankie the Mermaid CAL! Last week we made the full body, which can be found here, and this week we will be making all the Fins, Arms, Bra! As well as learning to attach the hair.
Arms (Make 2) - with Meadow if using Wander
Rnd 1: Sc 5 into Magic Ring (5)
Rnd 2-7: Sc around (5)
Finish off
Screws (Makes 2) - with Cobblestone if using Wander
Rnd 1: Sc 4 into Magic Ring (4)
Rnd 2: *Sc, inc* around (6)
Rnd 3: Sc around (6)
Finish off
Bra - with Alabaster if using Wander
Ch 11
Row 1: HDC into second chain from hook. Hdc across (10)
Row 2-3: Ch 1, turn. Hdc across (10)

With your mini rectangle, take a long strand of black yarn. Insert through the center of the piece. Pull tight and then pull the yarn around a few time to create a bow shape! (Seen below)

Fins (Make 2)
Begin with Lavender - or Bergamot if using Wander
Rnd 1: Sc 4 into Magic Ring (4)
Rnd 2: *Sc, Inc* around (6)
Rnd 3: *Sc 2, Inc* around (8)
Rnd 4: *Sc 3, Inc* around (10)
Rnd 5: *Sc 4, Inc* around (12)
Rnd 6: *Sc 5, Inc* around (14)
Rnd 7: *Sc 6, Inc* around (16)
Rnd 8: *Sc 6, Dec* around (14)
Rnd 9: *Sc 5, Dec* around (12)
Rnd 10: Dec around (6)
Finish off

Meet back here next week for the final part of this CAL, where we will be attaching the hair, embroidering the face, and attaching all the limbs!
PART THREE
Now, we will be attaching the hair! To do so, follow along with the photo tutorial down below:


With a long strand of black yarn, grab hold with your hook and pull through the stitch.

When you have the yarn pulled through, grab the other end and pull through your loop with your hook to secure it!

You will want to be sure you add those three white stripes on the front!
Next, it’s time to add on all your limbs!
The tricky part will be attaching the fins to have it look like they’re upward, to do that, you are going to want to attach the fin to the tail and the body, as seen below:

And there you have it, your very own Frankie the Mermaid! I hope you had a blast making this fun mesh-up for the holiday season of Halloween. She might not be spooky, but I think she fits right in! Be sure to find me over at Knotbadami.com!

ABOUT OUR DESIGNER
Hi everyone! My name is Vincent and I am the artist behind Knot Bad! I am the 23-year-old man who lives for Pokemon, heavy metal music, and my fair share of cinnamon rolls. I specialize in fun amigurumi and over the top crochet wear, however, I am making it a goal of 2018 to get into some fashion pieces in the Form of Yarn Punk. I reside in the Northwest of the United States in Portland, Oregon. I offer free patterns on my website, knotbadami.com, and you can find me on Instagram (@knot.bad) and Pinterest at Knot Bad Crochet! I may look familiar here to some of you, but to those who are now seeing me for the first time, it’s lovely to meet you!


